Managing E-mail Messages
Creating Folders
In Webmail you can create folders for your e-mail messages. When a folder is no longer needed, you can delete it. Once you've created a set of folders, you can use filters to sort incoming messages and put them in specified folders.

To add and delete folders:
- Select the Folders link from the Links menu to open the Folders page in the Webmail Contents window. All top-level folders are displayed in a "tree" view. The following data is available per folder:
- Total: The number of messages per folder.
- Unread: The number of messages in that folder that haven't been read. If you have message filtering capabilities, the Unread message column shows you when filtered messages have arrived in any of your subfolders.
- To add a folder, enter a name in the text box, and click the Add button. The new name appears in the tree as a link to the new folder.
- To delete a folder, first display it on the Folders page and then click the Delete icon
 for that folder.
- In response to the resulting Confirm Folder Delete page, click the Delete button. The folder name is then removed from the folder tree. You will be returned to the Folders page.
Note: You cannot delete system-created folders such as Inbox, Sent, or Draft; non-deletable folders do not have a clickable Delete icon.
| Reserved Characters in Folder Names
Every folder must have a unique name (e.g., January04Mail, Mail_from-mgt) made up of characters from the following set:
|
Special Characters You Cannot Use in Folder Names
|
[To learn more about editing folder properties or adding subfolders within a folder, select Help—›WebMail Tasks—›Folders—›Working with Folders .]
Moving or Copying Messages to a Folder
It can be cumbersome to try to manage all of your messages in the Inbox. We recommend that once you have read a message, should you choose to keep a copy of it (rather than deleting it), you should move it into another folder (that you have already created).
To copy or move messages between folders:
- With the contents of your Inbox Message List window displayed, do one of the following:
- Select the check boxes of the messages you want to move to a folder; or,
- Click the Select link to select all of the messages displayed in the Inbox Message List window. If there are a few messages you do not want to include, you can click the check boxes for those messages to remove the check marks.
- From the Folder menu at the right end of the Command bar, choose the name of the folder into which you are placing the messages and click either the Copy or Move button.
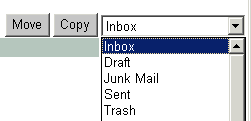
- If you click Move, all of the selected messages are transferred to the selected folder.
- If you click Copy, copies of the selected messages are transferred to the specified folder. This process leaves the original messages in place, resulting in two copies of the messages: one in the selected folder and one in the Inbox. (This is the less desirable option.)
Creating Message Filters
A filter is a set of conditions, or rules, associated with an action. These rules are applied to incoming e-mail messages and attachments, and the messages and attachments are processed accordingly. For instance, let's say you have a folder for mail about or received from "Campus Parking". You can create a set of rules that will automatically filter any e-mail you receive with the words "Campus Parking" in the subject, sender or message body fields directly into the Campus Parking folder. It will not take up space in your Inbox, but you will need to remember to look at your Folder list to see if you have new messages in the Campus Parking folder.
Setting Up a Filter Condition
- Click on the Options link in the Links menu. From the Options page click on the Message Filters link. Once you have existing filters, their order and profile display at the top; you may have to scroll down to reach the Filter Conditions - Add New Filter area.
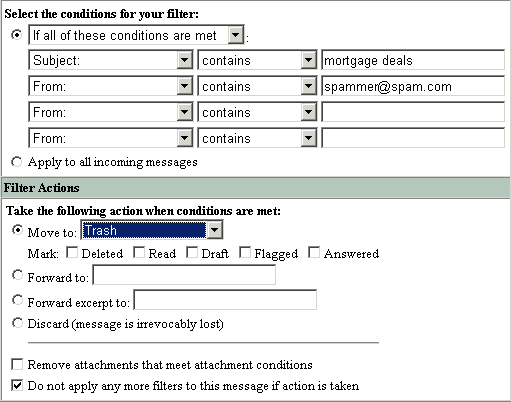
- In the Filter Conditions - Add New Filter area specify the following:
- The first radio button sets an initial parameter for the conditions you must specify; choose from the menu either:
- If all of these conditions are met: Filter action is done only if all of the specified conditions are true.
- If any of these conditions are met: Filter action is done if at least one of the specified conditions is true.
- Or you can select the other radio button:
- Apply to all incoming messages: Filter action is done on all messages regardless of conditions. This option is deselected (disabled) by default.
- Next, choose a "filter object" (below are the most frequently used filtering criteria):
- From: filters on the e-mail address of the person who sent the message.
- To/CC: filters on the e-mail address(es) of the recipient's (does not include BCC recipients).
- Subject: filters on text in the subject line.
- Body: filters on the text of the message and text attachments including Plain text, HTML text, and Rich Text.
- Return-path: filters on the message return-path address.
- X-Junkmail: you can use this parameter to have all system-identified junkmail filtered.
- Attachment MIME Type: filters on the attachment media type. Choices include text, multipart, message, application, image, audio, video, and model; use the matches rather than the contains content condition (next bullet item) and search for something specific like " application/vbs " or " image/jpeg ", and so on.
- Attachment file name: filter on the attachment name. You can use the asterisk wildcard (only with the matches and does not match options); for example, *.vbs.
[For more information on MIME and filtering attachments, see Help—›WebMail Tasks—›Message Filters—›About MIME and Filtering Attachments .]
- Next, choose a content condition for the "filter object" (below are the most frequently used filtering conditions):
- contains: The specified parameter must contain the text you enter. Wildcards are not honored; for example, the filter condition: " contains " " doc " would be met with any of these words: "doc", "document", "undocumented", "doctor", and so forth.
- does not contain: The specified parameter must not contain the text you enter. Wildcards are not honored.
- matches: The specified parameter must match the text you enter. Wildcards may be useful; for example, the condition " matches " " Dr. Spock " would only be met by "Dr. Spock," but the condition " matches " " Dr. Sp* " would be met by "Dr. Spock", "Dr. Spark", "Dr. Sproul", and so forth.
- Does not match: The specified parameter must not match the text you enter. Wildcards may be useful.
- Your final filter condition option is a value for the filter object. Enter the text, integers, MIME type, or file name you want searched for and acted on in the appropriate box. You can use the following wildcard characters with the matches or does not match options only:
- Asterisk ( * ): Matches any sequence of zero or more characters. Example: to find all attachments with filenames ending in ".vbs", use these filter conditions: Attachment file name: matches " *.vbs "
- Question mark ( ? ): Matches any single character. Example: to find all messages from "Maria" or "Marie", use these filter conditions: From: matches " Mari? "
- The first radio button sets an initial parameter for the conditions you must specify; choose from the menu either:
Setting Up a Filter Action
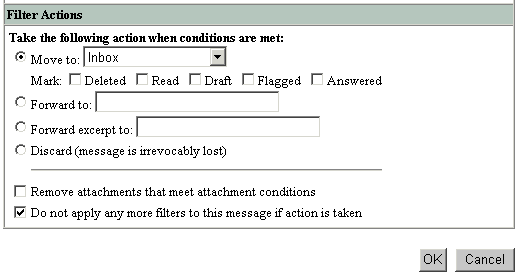
- In the Filter Action area specify a response, select one:
- Move to <folder> (default): Matching messages are moved to the specified folder.
- Forward to: Matching messages are forwarded as specified.
- Forward excerpt to: The first several lines of matching messages are forwarded as specified. This option is useful in conjunction with wireless devices.
- Discard (message is irrevocably lost): Matching messages are deleted. [OIT does not recommend choosing "Discard" due to the possibility of losing valid messages that match the filter condition(s). Instead, move items to a folder where you review and delete them manually.]
- Remove attachments that meet attachment conditions: Attachments that meet the specified attachment conditions are removed and a message is appended to the body indicating that the attachment was removed. This option is deselected (disabled) by default. To enable this feature, select the checkbox.
- Do not apply any more filters to this message if action is taken: If the message qualified for action by the filter, any filters listed below the newly created filter are not applied. This option is selected (enabled) by default. To disable this feature, clear the checkbox.
- Once you have created your filter, click the OK button. Webmail accepts the settings and a description of the filter appears above the Filter Conditions box. Incoming messages and attachments are filtered and acted on as directed.
Controlling Junk Mail
The Office of Information Technology provides a Junk Mail analyzer on the Mail@umd server that can be modified as per user preferences. Steps for activating and configuring the Junk Mail Analyzer can be reviewed at the E-mail Filtering with the Junk Mail Analyzer webpage.
Should you desire an additional layer of filtering, the Webmail Junk Mail filter can be configured to further refine the mail blocking process. Use the Junk Mail Control page Junk Mail Filter view to customize the Webmail Junk Mail filter.

Editing the Junk Mail Filter
- Click on the Options link in the Links menu, then click on the Junk Mail Control link in the Options Content window.
- Click on the Junk Mail Filter link to define the conditions under which Junk Mail will be identified and how it will be removed from your Inbox.
- Your filtering conditions include the following, one of which can be selected by clicking in the radio button associated with it:
- Off: don't perform any Junk Mail filtering.
- Normal (Junk Mail only): Only e-mail identified by the mail server as Junk Mail is subject to the filter actions you specify below.
- Exclusive (any mail from sender not on White List): All of your mail from senders not on your White List is subject to your specified filter action.
- In the Filter Action area specify what should be done with a message identified as Junk Mail by selecting one of the following actions:
- Move to the junk mail folder (default): Messages are moved to your Junk Mail folder. Note: You can change the name of your junk mail folder via Webmail Preferences.
- Discard (message is irrevocably lost) : Messages are deleted. [OIT does not recommend choosing "Discard" due to the possibility of losing valid messages that match the filter condition(s). Instead, move items to a folder where you review and delete them manually.]
- Do not apply any more filters to this message if action is taken: If the message qualified for action by the Junk Mail filter, any filters in order below the Junk Mail filter are not applied. This option is selected (enabled) by default.
- Once you have created your filter, click the OK button.
White List
You can create a list of senders who are protected from antispam scanning or Junk Mail filtering by selecting the "White List" option from the Junk Mail Control page. Messages from senders on your White List are always sent to your Inbox. Note: White List entries override Black List entries.
To create a White List Entry:
- Click on the Options link in the Links menu, then click on the Junk Mail Control link in the Options Content window.
- The White List view is the default view on this page. (Note: You can open this page directly by clicking the Add To White List link next to the sender's name in the From line of any message in your Junk Mail folder.)
- In the E-mail address or Domain Name text box enter the e-mail addresses of senders who you want on your White List and click Add To White List.
Mail sent from senders on your White List is forwarded to your Inbox with a header, X-Junkmail-Whitelist: YES (by user at <hostname>), added; such mail never treated as junkmail. - To remove a sender from your White List, highlight the sender's e-mail address or domain name and click the Remove button. The sender will then be subject to antispam scanning and specified Junk Mail filtering.
Examples of valid White List entries:
- myfriend@example.com: Specifically adds the user myfriend from example.com to your White List.
- @umd.edu: Adds any address at umd.edu to your White List.
- @*.example.com: Adds any address at any host within the example.com domain to your White List.
Black List
You can create a list of senders who are always subject to Junk Mail filtering by selecting the "Black List" option from the Junk Mail Control page. Important!: White List entries override Black List entries.
To create a Black List:
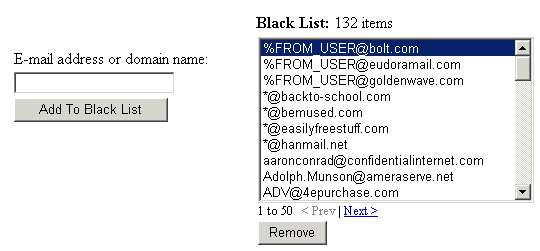
- Click on the Options link in the Links menu, then click on the Junk Mail Control link in the Options Content window.
- Click on the Black List link to display the Black List page. Note: You can open this page directly by clicking the Add To Black List link next to the sender's name in the From: line of any message in any folder except your Junk Mail folder.
- In the E-mail address or Domain Name: text box enter the e-mail addresses of senders who you want on your Black List and click Add To Black List.
Mail sent from senders on your Black List is acted on by the Junk Mail filter (if enabled) or forwarded to your Inbox with a header, X-Junkmail-Blacklist: YES (by user at <hostname>), added; additionally, your system administrator may configure a message to be automatically added. - To remove senders from your Black List, highlight the sender's e-mail address or domain name and click the Remove button.
Example valid Black List entries:
- mynemisis@example.com : Specifically adds the user mynemisis from example.com to your Black List.
- @freestuff.com : Adds any address at freestuff.com to your Black List.
- @*.example.com : Adds any address at any host within the example.com domain to your Black List.
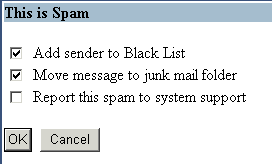
Labeling Mail as Spam
From time to time messages will make it into your Inbox Message List that neither your own or server junk mail filters have identified as junk or spam. When you view the message in the Message List window you will have the opportunity to flag it as spam.
 |
|
Common Virus Attachment Names
The following is a list of file extensions that often have viruses in them. "File extension" refers to the last three letters after the period in the file name (i.e. the file word.doc has the file extension of .doc). Note: Not all viruses have these extensions; this is just a list of common types.
- .Trojan
- .scr
- .vbs
- .pif
- .hta
- .reg
- .bat
Searching for Messages
You can search for the following items in relation to your messages:
- Who sent a message.
- Who the message was addressed to, or who received a copy of the message.
- How large or small the message is (in kb).
- The text in the Subject line.
- A text string in the body of the message.
You can refine the focus of the search by specifying either of the following:
- Search only the unread messages in the current folder.
- Search only the messages that were the results of a previous search.
Search queries are case-insensitive. This means that a query for all messages from Brad would return the same results as a query for all messages from brad.

To search for a message:
- Click the Search link in the Links menu.
- Define the parameters for your search in the fields at the top of the Search window using any of the following:
- Enter a name in the From: text box. You can use Boolean operators to search for a combination of names; e.g., dmote@umd.edu OR wdestler@umd.edu.
- Enter a name in the To/Cc: text box. You can use the AND, OR, NOT Boolean operators to search for a combination of names; e.g., jdoe@umd.edu OR doej@umd.edu.
- Enter a number for message size (kb) in the Larger than: and/or Smaller than: text boxes.
- Enter a text string in the Subject: text box.
- Enter a text string in the Body: text box.
- Optional:
- Select the Search in unread only check box to only search in the unread messages in the current folder. If this option is not selected (default), the search is performed on all the messages in the current folder.
- Click the Search button. The results are shown below the search parameter options.