Composing a Message
Composing a message can go beyond simply typing a message and sending it. This unit reviews steps for creating a message as straight text or in HTML format, checking it for spelling errors, personalizing it with your electronic signature, adding attachments, and saving a copy of the message for your own archival purposes.
Creating the Message
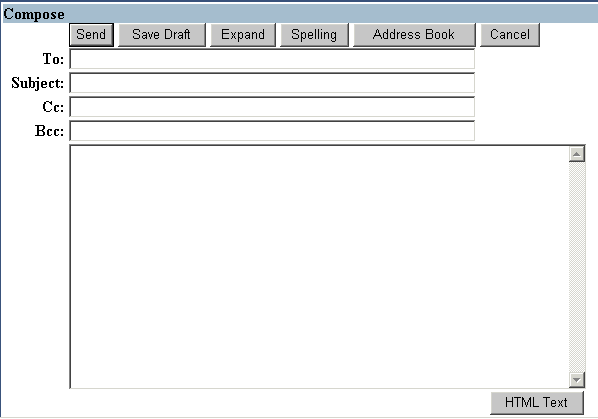
To replace the Contents window with the Compose window click on the Compose link in the Webmail Links menu. To alternatively open the Compose window in a new window, right click on the Compose link and choose the Open in New Window option. In this case, a Compose window only (without the links or command menus) opens. You will then close the window after you send the message.
By default, the messages you create will be plain text. You can change that default setting for all messages through Webmail Preferences, or you can choose to create a message in HTML format on a message by message basis. (Note: in order to use the HTML Text compose feature you must have an Internet Explorerô browser more recent than 4.x with JavaScript enabled; this feature is not available in the Netscape browser.)
 |
‹—HTML Text button is not available in Netscape. |
To compose a message:
- Select the Compose link in the Links menu. A text entry cursor is automatically placed in the To: field. Press the Tab key on your keyboard to move between fields.
- Type the e-mail addresses of your intended recipients in the To: field. For more than one recipient, separate the entries by commas and spaces; e.g.,
johndoe@umd.edu, janedoe@umd.edu
[See Using the Address Book , Accessing the Address Book When Composing a Message, for more information.] - Provide a brief subject statement in the Subject: field. Be as concise as possible; some browsers only display a limited number of characters. (Note: many mail servers will not post or accept e-mail messages that lack a Subject line.)
- The Cc: and Bcc: fields enable you to enter e-mail addresses to send a copy of the message to someone else. The recipients of your message will see the e-mail addresses listed in the To: and Cc: fields; however, the Bcc: (blind carbon copy) recipient names will be hidden from message recipients.
- Press the Tab key to move your cursor to the message text field.
Text-only Message: to create a simple text message just type in the message text field.
HTML Text Message: to create a message with HTML formatting options, click the HTML Text button at the lower right of the Compose window (Internet Explorer only). The Compose window will "refresh" to display these options at the top of the window:

- Paragraph: Use the drop down list to select from standard HTML paragraph style options including Normal, Headings 1-6, and Preformatted.
- Font Style: Use the drop down list to select from standard HTML font style options including Arial, Times New Roman, Courier New, and so forth.
- Size: Use the drop down list to select different font sizes.
You will also see some additional options at the bottom of the composition window:- Edit HTML: Use this option to directly work with the HTML source of your composition.
- Plain Text: Use this option to compose in plain text if you selected HTML Text.
- Once you finish your message, be sure to check it for spelling errors before sending it.
Spell Checking
After you enter your text in the Compose window check for spelling errors by clicking the Spelling button in the Compose Command bar.

Check a composition for spelling errors:
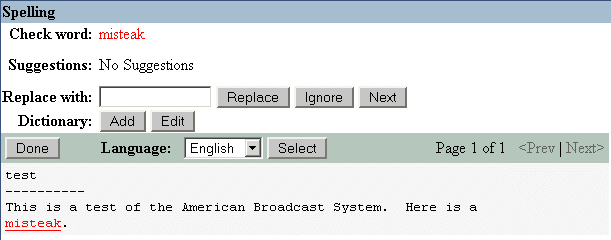
- Once you click on the Spelling button the Spelling page is displayed. The top of the window contains command buttons; the message text displays in the bottom part of the window. If you are checking a very large message, a page count displays at the right along with Prev and Next links so you can page through your message. Words whose spelling is in question are underlined and shown in color. The current word in question is highlighted in a different color and displays at the top as the Check word value.
- For the current highlighted word, do one of the following by clicking on the corresponding button:
- From the Suggestions menu choose a correct spelling for the word, and click Accept.
- Enter the correct spelling of the word in the text box, and then click Replace.
- Click Ignore to deselect the word along with all other occurrences in the text, and move to the next underlined word.
- Click Next to skip to the next underlined word. If you are already on the last underlined word, no action is taken.
- Click Add next to Dictionary: to add the word to your personal dictionary.
- Click Done to return to the Compose window with the corrected text is displayed.
Electronic Signature
An electronic signature is a useful device for providing recipients of your message with your complete "calling card". Electronic signatures usually include your name, title, department, University phone number and e-mail address.
|
Put signature image here. |
Attachments
To attach an external file to a message, browse your desktop for the file and add it to your message in the Compose window. You can add more than one attachment to a message, but attachments must be added one at a time.
To add a file as an attachment:
In the Attachments: field at the bottom of the Compose window, specify the file you want to add as an attachment in one of the following ways:- Enter the name in the File: text box; or,
- Click the Browse button to find the location of the file on your computer. Select it and click the Open button.
- Click the Add button. A link for the attachment
 will then be displayed at the bottom of the window with a Trash can icon next to it. Click the attachment link to view the attachment. Click the Trash can icon to delete it.

Sent Mail
When you have completed your composition, you can choose between sending the message, saving it as a draft, or canceling the message. If you click the Send button, the message and attachments (if any) are sent to the specified recipients.
Saving Drafts
Click the Save Draft button to save a draft of the message to a Draft folder automatically provided in Webmail. Directing a message to the Draft folder saves the message so you can review it and send it later.
Sending a Saved Draft:
- Click on the Folders link in the Links menu.
- Click on the Draft folder, then click on the message Subject link to open the message.
- Make message adjustments, as needed, then click the Send button.
(Note: If you use another e-mail client (e.g., Netscape Messenger, Outlook Express) as well as Webmail, you may also have a Drafts folder. Webmail uses the Draft folder, not the Drafts folder.)
Save a Message Copy
When you send a message you have the ability to additionally save a copy of the sent message. Webmail automatically provides you with a Sent folder into which you can direct copies of the messages you send.

To save a copy of the message for your files when it is sent, leave the Save copy of sent message check box selected (as it is by default).
