This is a set of spreadsheets that perform simulations of
widely-used analytical calibration methods. Each spreadsheet
simulates an "unknown" sample solution whose concentration is to
be measured by an analytical instrument that generates a
signal related to concentration. You can specify the "true"
concentration of the unknown in the sample solution, then the
spreadsheet simulates a measurement of it, using the specified
calibration method to establish a calibration based on one or more
standard solutions and to convert instrument readings into
concentration (including typical experimental errors), reports the
calculated result, and compares it to the true value that you
specified. To be more realistic, these simulations include typical
systematic and random errors in both signal and in volumetric
measurements. They demonstrate how non-linearity, interferences,
and random errors combine to influence the final result and and
they allow you to optimize precision and accuracy of the
measurement. All of these spreadsheets are now available in both Excel
and OpenOffice Calc versions.
Screen shots and Download links:
Single external standard
Download in Excel
or Calc format
Two-standard bracket method
Download in Excel
or Calc format
Calibrationcurve method with linear fit
Download in Excel
or Calc format
Calibration curve
method with non-linear fit. Download in Excel or Calc format.
Single standard
addition method
Download in Excel or Calc format
Multiple standard addition method
Download in Excel or
Calc format
Excel versions require a reasonably recent version of
Excel. Calc versions require the OpenOffice program,
which is a free download from OpenOffice.org for either
PCs or Macs. The two versions are mathematically equivalent but
slightly different cosmetically.
Background.
In analytical chemistry, the accurate quantitative measurement of
the composition of samples, for example by various types of
spectroscopy, usually requires that the method be calibrated
using standard samples of known composition. This is most
commonly, but not necessarily, done with solution samples and
standards dissolved in a suitable solvent, because of the ease of
preparing and diluting accurate and homogeneous mixtures of
samples and standards in solution form. (Note: calibration methods
may be contrasted to "absolute analytical methods", in which the
concentrations of samples are calculated with the aid of
previously-measured fundamental data rather than from standards
that are measured along with the samples. Absolute methods are
occasionally performed when preparing standard samples is
difficult or impossible, especially in the measurement of
atmospheric gases in situ using laser spectroscopy).
Calibration errors. Calibration
procedures are subject to error
caused by several complications:
a.
Analytical curve non-linearity. The analytical
curve is a plot of the signal from the instrument vs the
concentration of the analyte (the chemical species whose
concentration is sought). This is closely related to the calibration curve, which is a
plot of the signal from the instrument vs the concentration of the
standard solutions. In the absence of interferences, the points of
the calibration curve should fall along the analytical curve. If
the analytical curve is linear, calibration procedures are much
simpler, both mathematically and procedurally. If the relationship
in non-linear, a series of standard solution must be prepared and
measured to establish the shape of the curve, which is
time-consuming as well as requiring the use of larger amounts of
standard materials (which can be expensive and will eventually
require safe disposal). Commonly, calibration curves are
observed to be approximately linear over a certain concentration
range, but non-linear above that range. In some well-defined
cases, the shape of the analytical curve can be predicted, for
example in absorption and in fluorescence spectrophotometry.
b. Additive
interferences. Ideally, samples
and
standards should give a zero reading when the analyte
concentration is zero. Commonly, the instrument readout is
zeroed when a "blank"
is measured (a "blank"
is a solution containing zero concentration of analyte in the
same solvent and containing vessel). But in many cases this is
not enough, because some other unknown chemical components that
are present in the samples (but not in the standards) are
contributing their own signals to the total signal measured.
Unless it it possible to resolve (separate) the signal generated
by these components from that of the analyte, the signal
measured in that case will be higher than it should be, leading
to an error in the analysis. This is called an "additive interference", because the
signal from the interfering components adds to that from the analyte. So even if the analyte's concentration is zero,
you still get a signal from the sample. In spectroscopy, this is often
called a "spectral interference".
c. Multiplicative interferences.
Ideally, a given concentration of analyte will give the same
signal reading in the sample as in the standards (in other
words, the slope
of the analytical curve is the same in the samples and
standards). But
sometimes there are conditions
or components present in the samples (but not in the standards)
that make the analyte's signal stronger or weaker that it is in
the standards; it might be a difference in temperature, pH,
ionic strength, density, viscosity, surface tension, or a
specific chemical component that reacts with or binds with the
analyte. This is
called an "multiplicative
interference", because the analyte's signal is in effect multiplied by some unknown
factor. This is
distinct from an additive interference, because with a
multiplicative interference, you still get a zero signal when
the analyte's concentration is zero.
d. Random errors (uncertainty) and the
propagation of random errors. In addition to the systematic
errors considered above, analytical methods are also subject
to random
errors (imperfect repeatability) due to several sources. For
example, the preparation of analyte and standard solutions is
subject to random errors in volumetric measurements, and the
instrument's reading itself is subject to random variability due
to electronic
noise generated by electronic amplifiers and detectors,
instability of light sources, and photon noise,
especially when the concentration of the analyte is very low.
Proper instrument design and careful technique can reduce, but
never completely eliminate, such errors.
The size of random errors are usually
described by the standard
deviation, s,
defined as
where N is the number of data points, xi are the individual points, and x
is the mean (average) of all the x's. Spreadsheets and most programming languages
have a built-in function for standard deviation. The relative
standard deviation, given by s/x, is
often also reported, as a percentage.
e.
Calculating the propagation of random errors. The way
that random errors combine and influence the final precision of
the measurement is called propagation
of
error. When you compute some quantity that is based on two
or more measurements, you need to be able to figure out how
reproducible the calculated quantity will be when the input
variables are subject to random variability. If you know the
standard deviation of each of those input measurements, you can
calculate the expected standard deviation of the calculated
quantity in two different ways:
1. Do the math. By using the rules for mathematical error
propagation. In principle the propagation of errors of
the entire calibration method can be described by closed-form
algebraic formalism
by breaking down the equation into a series of simple differences,
sums, products, and ratios, and applying the rules for error propagation to
each step. However, there are two problems with this approach. If
the calculation is complicated, the error propagation can become
really complicated and difficult. Secondly, the usual rules for
mathematical error propagation assume that the random errors of
the various terms of the calculation are not correlated:
if they are correlated, the calculations become even more
complicated. Correlation between terms occurs in the prediction of
error propagation of the bracket and standard addition methods.
The bottom line is that it is often difficult to predict the
propagation of errors by doing the math. 2. Crunch
the numbers. By repeating all the calculations over and over again
(obviously using a computer) with random number generators
employed to add realistic amounts of random variability ("noise")
to the input variables. (This is sometimes called a "Monte
Carlo" approach, a reference to the famous gambling casinos
in that small country). This is relatively easily set up
using spreadsheets, which are well suited to performing laborious
repetitive calculations and even have built-in random number and
statistical functions. The advantage of this approach over
closed-form algebraic formalism is that it can be applied to
essentially any arbitrarily-complicated procedure and it
automatically takes into account any correlation between
variables. The disadvantage is that it is less "elegant" and can
not be expressed in a neat formula.
These spreadsheets perform both of these type of
calculations, so you can compare them. It's important to
understand that even a perfectly accurate calculation of error
propagation predicts only the expected standard deviation "on
average", for a very large number of repeats. If you were to
repeat an actual experiment a few times and compute the standard
deviation, you'll often get only a very rough approximation to the theoretical
result, perhaps off by 2 or 3-fold. This is a basic problem of
statistics in analytical chemistry; the theoretical predictions
work well for very large number of repeats, but in analytical chemistry the cost
and time of doing even a few repeats is often prohibitive.
For this reason it is not worth obsessing about small differences
in precision; the statistical uncertainty in measuring the
precision of any one method is likely to be greater than the
differences between the different methods.
Calibration methods.
The methods described below are the most commonly-used analytical
calibration methods. Each of these methods, from the simplest to
the more complex, is modeled by a separate simulation spreadsheet,
which includes all of the above-mentioned systematic errors, plus
random errors due to both volumetric measurement and signal
measurement. These simulations allow you to investigate how all of
these errors combine an propagate to the final result. All of
the simulations have a very similar structure and layout, so once
you learn how to work the first one, using the others will be
relatively straightforward. The concentration of the unknown
sample, Cx, and its predicted standard deviation, is calculated in
a different way in each of these calibration methods.
This is the simplest
calibration method, in which the sample and a single separate standard
solution are measured. This method assumes that the calibration
errors a,b, and c, listed above, are absent.
The concentration of the sample Cx is given by Cs*Sx/Ss, where
Cs is the concentration of the standard solution, Ss is the
signal given by that standard solution, and Sx is the signal
given by the sample solution. The predicted relative standard
deviation of Cx is easy to compute in this particular case, if
you know the standard deviations of Cs, Sx, and Ss: there are
just three variables, all multiplied or divided, so according to
the rules for error propagation,
the relative standard deviation of Cx is the quadratic sum
(square root of the sum of the squares) of the relative standard
deviations of Cs, Sx, and Ss, which in this simulation are Ev,
Es, and Es, respectively (see cell C68).
In this calibration method, the sample is measured along with
two standard solutions that are close in concentration to
the sample (typically one lower than and one higher than the
sample concentration). This
method has the advantage of approximately compensating for
non-linearity in the analytical curve, if the two standards
are close in concentration to the sample. It's a useful
method when you have many samples to analyze that have about the
same analyte concentration. However, this method still
assumes that calibration error conditions (b) and (c) are
absent. A disadvantage of this method is that it requires more
time and uses twice the amount of standard material as the
single-standard method.
The concentration of the sample Cx is calculated by linear
interpolation between two standard solutions and is given
by C1s+(C2s-C1s)*(Sx-S1s)/(S2s-S1s), where C1s and C2s are the
concentrations of the two standard solutions, S1x and S2s are
the signal readings given by the two standards, and Sx is the
signal given by the sample solution. The predicted standard
deviation of Cx is more complex to compute in this case,
but it can be done by breaking down the equation into a series
of differences, sums, products, and ratios, and applying
the rules for error
propagation to each step. (In the spreadsheet "BracketOO.ods",
these error propagation calculations are performed in cells
C98:F103).
A series of external standard solutions of different
concentrations is prepared and measured. A first-order least-squares fit of
the data is computed and the resulting equation is used to
convert readings of the unknown samples into concentration. An advantage of this method
are that the random errors in preparing and reading the
standard solutions are averaged over several standards.
Moreover, non-linearity in the calibration curve can be detected
and avoided (by diluting into the linear range) or compensated
(by using non-linear curve fitting methods). An obvious
disadvantage of this method is that it requires much more time
and uses more standard material than other methods. The
calibration data (Cs vs Ss) are fitted with a first-order
least-squares fit. (The fit is shown as the straight red line in
the graph).
The concentration of the sample Cx is calculated by Cx = (Sx-intercept)/slope, where Sx is the
signal given by the sample solution, and "slope" and "intercept" are the results
of the least-squares fit. (In this simulation, rather than
choosing each standard solution separately, you choose the
number of standards (from 2 to 18) and the concentration of the
highest one; the other standards are automatically evenly
distributed between zero and the specified highest). The
predicted standard deviation of Cx is computed from the standard
deviations of the slope and intercept given by the curve fitting
procedure and the standard deviations of Sx, as shown in
cells D111:F119.
A series of external standard solutions is prepared and
measured. A non-linear model function is selected that is expected
to be a good fit to the calibration data (e.g. a quadratic or
cubic function), a least-squares fit of that model to the data is
computed, and the resulting non-linear equation is solved for
concentration and used to convert readings of the unknown samples
into concentration. An
advantage of this method is that non-linearity in the
calibration curve is compensated at least approximately,
depending on the nature and severity of the non-linearity of the
calibration curve and the choice of non-linear fitting model
equation. The calibration data (Cs vs Ss) are fitted with a
second-order (quadratic) least-squares fit. (The fit is shown as
the curved red line in the graph).
The concentration of the sample Cx is calculated by the
"Quadratic equation": Cx = (-b+SQRT(b^2-4*a*(c-Sx)))/(2*a) where
Sx is the signal given by the sample solution, and a, b, and c
are the coefficients from the quadratic least-square fit
(quadratic, linear, and intercept, respectively). (In this
simulation, the number of standards is fixed at 18; you can
choose the concentration of the highest one and the other 17
standards are automatically evenly distributed between zero and
the specified highest concentration).
In this method, the sample is divided into two portions: one
is measured unmodified and the other is "doped" with the
addition of a small amount of pure standard and then measured. This method has the advantage of
compensating for multiplicative interferences (c,
above), but it still assumes that the analytical curve is linear
and that additive interferences are absent.
The concentration of the sample is given by
(Sx*Vss*Cs)/(Ss*(Vxx+Vss)-Sx*Vxx), where Cs is the concentration
of the standard solution, Sx is the signal given by that sample
solution by itself, and Ss is the signal given by the sample
solution after the addition of standard, and Vxx and Vss are the
volumes of the samples and standard solution. The predicted
standard deviation of Cx is computed by breaking down the
equation into a series of differences, sums, products, and
ratios, and applying the rules
for error propagation to each step. These error
propagation calculations are performed in cells D111:F118.
A series of aliquots of the sample solution are taken,
increasing amounts of standard material are added to each one,
and the signals from the resulting mixtures are measured and
plotted against the concentration of added standard. If the
resulting calibration curve is sufficiently linear, a
first-order least-squares fit of the data is computed. The
sample concentration is given by the negative of the x-axis
intercept (and to the ratio of the y-intercept to the
slope). This method has
the advantage of compensating for multiplicative
interferences. Compared to the single addition method
(below), this method reduces the random errors in preparing and
reading the standard solutions. Moreover, non-linearity in the
calibration curve can be detected and avoided (by diluting into
the linear range) or compensated (by using non-linear curve
fitting methods). An obvious disadvantage of this method is that
it requires much more time and uses more standard material than
most other methods.
The concentration of the sample is given by intercept/slope, where "slope" and "intercept" are the results
of the first-order least-squares fit of the standard addition
calibration curve, shown as the straight red line in the graph.
The predicted relative standard deviation of Cx is the quadratic
sum (square root of the sum of the squares) of the relative
standard deviations of the slope and intercept computed by the
curve fitting procedure. These error propagation calculations
are performed in cells B82:F87.
When you are using these spreadsheets, you can inspect the equations
that perform these calculations by clicking on a calculated cell and
looking for the equation that calculates that cell in the
rectangular box at the top of the screen. You'll notice that some
cells in these spreadsheets have a tiny red squares in their upper
right corners; that means they have an attached note, which you can
read just by mousing over the cell without clicking.
Brief
operating Instructions.
The screen display of each of the simulations have five
similar areas:
The
yellow table on the top left of the screen are independent
variables that you can change. Click on
the dark blue boldface numbers, type a new value and press the enter
key. In the OpenOffice Calc versions, some of these
variables can be controlled continuously by the sliders on the top
right; in the Excel versions, just type directly into these
cells. (The units of concentration in these simulations are
normalized to the range of 0 - 10 for convenience in entering and
plotting; you can think of them as mmoles/liter, µmoles/liter,
grams/liter or any other convenient unit (1 mmole = 0.001 moles; 1
µmole = 10-6 moles). Similarly, the signal units are
arbitrary for similar reasons).
The graph
on the lower right shows the actual analytical curve (blue line)
over the concentration range from 0 to 10 (arbitrary units), with
the actual concentration of the unknown sample marked as a yellow
triangle. The red triangles are the standards. The green triangle
is the calculated concentration of the unknown sample according to
that calibration method. In the linear calibration curve and
multiple standard addition methods, the red line represents the
linear least-squares fit to the calibration curve. The graph
responds dynamically as you adjust the variables (e.g. with the
sliders).
The table
in the middle left of the screen, labeled "Computed results", are
dependent variables that are automatically calculated from
the independent variables (don't type in those cells or you will
delete the formulae). The most important dependent variable is
"result", which is a single simulated experimental measurement of
the analyte concentration Cx based on that calibration method.
The "Statistics" section at the
lower left of the screen shows the mean, standard deviation, and %
relative standard deviation (%RSD) of 20 simulated repeat
calibrations and measurements of the unknown concentration Cx.
Here, a repeat calibration means that a complete set of new standards are prepared for
each repeat. This gives an idea of the reproducibility if the
entire procedure is repeated. The "% RSD" in the table is the
relative standard deviation of 20 repeated simulated
calibrations; it can be compared to the "Est. RSD" in the Computed
results table above, which is the predicted relative standard.
based onpropagation or error rules. Both should
ideally be the same, but for a variety of reasons will
usually not agree exactly. The statistics are re-calculated each
time an input variable is changed or a slider is moved.
In addition to these user-interface areas, there are "off-screen"
areas, below and to the right, that are used by the spreadsheet
for graphing, statistics, and error propagation calculations. You
don't need to change anything there, but you may inspect those
areas if you are interested in the technical aspects of how the
simulation spreadsheets work internally.
Assumptions:
1. The only sources of random error are random errors in volume
and signal measurement. They apply equally to all solutions and
readings of the samples and of the standards. Errors due to
interference and blank correction errors apply only to the sample
readings and are systematic (constant between measurements).
2. Random errors are expressed as a percentage of the quantity
measured (relative error rather than absolute error).
3. Non-linearity of the analytical curve is introduced by a
quadratic term whose coefficient is the variable "n" (controlled
by the first slider). (This is not rigorously realistic in
the case of the non-linearity in absorption spectroscopy caused by
polychromaticity and unabsorbed stray light. See Instrumental Deviation from Beer's Law
for a treatment of non-linearity in that particular case).
Cell definitions and equations
(for Bracket method, OpenOffice version): Inputs: mo : Analytical curve slope without interference z : Interference factor (zero -> no interference) n : Analytical curve non-linearly (0 = linear) Ev : Random volumetric error (% RSD ) Es : Signal measurement error (% RSD) Cx : True analyte concentration in sample C1s : Concentration of standard solution 1 C2s : Concentration of standard solution 2 blank : (Uncorrected) blank signal Outputs: Analytical curve slope in actual sample m = mo+z Signal given by standard 1 S1s =(mo*C1s-mo*C1s^2*n) * (1+0.01*2.5*Ev*(RAND()-RAND()))
* (1+0.01*2.5*Es*(RAND()-RAND())) Signal given by standard 2 S2s =(mo*C2s-mo*C2s^2*n) * (1+0.01*2.5*Ev*(RAND()-RAND()))
* (1+0.01*2.5*Es*(RAND()-RAND())) Signal given by unknown sample Sx =(blank+m*Cx-m*Cx^2*n) * (1+0.01*2.5*Ev*(RAND()-RAND()))
* (1+0.01*2.5*Es*(RAND()-RAND())) Measured analyte concentration in sample result = C1s+(C2s-C1s)*(Sx-S1s)/(S2s-S1s) Relative percent accuracy accuracy = (result-Cx)/Cx Relative % effect of interference on signal recovery = m/mo Array calculations for statistics (performed
off-screen): Average: mean = AVERAGE(I99:I118) Standard deviation: s = STDEV(I99:I118) Relative standard deviation: RSD = s/mean Accuracy = (mean-Cx)/Cx Note: The formulation 2.5*(RAND()-RAND()) seen in the above
equations is simply a way of generating random numbers
with a "haystack" distribution, a mean of zero and a
standard deviation of 1.0, using the RAND() function that by
itself gives a uniform distribution between 0 and 1. Suggested activity:
OpenOffice versions.
Error
propagation in analytical calibration methods: Step by Step
1. Open SingleStandard.xlxs or SingleStandardOO.ods. This is the simplest
calibration method, in which the only two things measured are the
unknown sample and a single separate standard solution of known
concentration. The table in the upper left lists the
variables that you can change in this simulation.
The most important one is
Cx, which is the true concentration of the sample solution.
(Of course, in the real world, you wouldn't know this
beforehand, but in these simulations you can set the true sample
concentration as you wish. The simulation "pretends not to
know" the true value and computes the measured sample
concentration from the sample and standard signals, just as you
would in the real world, then compares that calculated value to
the true value to determine the accuracy of the simulated
measurement). The other important variable is Cs, the
concentration of the standard solution that you prepare to
calibrate the system. The variable mo controls the slope of the
analytical curve, that is, the magnitude of the simulated signals.
The other variables
control simulated imperfections and sources of error: z controls multiplicative
interferences, blank controls additive interference, n
controls the non-linearity of the analytical curve, and Ev and Es control the random errors in
volume measurement and signal measures, respectively. If
these variable are set to zero, the simulated measurement should
be perfect.
In the OpenOffice Calc
versions, some of these variables can be controlled
continuously by the sliders on the top right; in the Excel versions,
just type directly into these cells in the Value column.
The table in the center
left lists the quantities that are computed by the simulation.
The most important of
these is the measured concentration of the sample, "result". In this calibration
method, it is given by Cs*Sx/Ss), where Cs is the concentration of
the standard solution, Ss is the signal given by that standard
solution, and Sx is the signal given by the sample solution.
You can click on the numbers in this table and look at the
input line at the top to see the equations that the simulation
uses to calculate that number. The measured signals, Sx and
Ss, take into account all the sources of error due interferences,
non-linearity, and random errors. The "Est. RSD" is the
estimated relative standard deviation of the result, computed as described above for that calibration method.
The graph on the lower
right shows the actual analytical curve (blue line) over the
concentration range from 0 to 10 (arbitrary units), with the
actual concentration of the unknown sample marked as a yellow
triangle. The red triangle represents the standard solution. The
green triangle is the calculated concentration of the unknown
sample (which should ideally overlay exactly the yellow triangle
representing the true sample concentration). The entire graph
responds dynamically as you adjust the variables (e.g. with the
sliders in the Calc version).
The "Statistics" section at the lower left of
the screen shows the result of 20 simulated repeat measurements.
The statistics are re-calculated each time an input variable is
changed.
Start the
experiment with mo=2, blank=0, Ev and Es=0 and set z=0, n=0, Cx=5,
and Cs=10. This represents an ideal case - a perfect world with no
interferences, no random errors and a perfectly linear analytical
curve. Under these conditions, the sample gives a reading of
Sx=10.000 units and the standard gives a reading of Ss=20.000
units. So of course the calibration works perfectly and the
"result" equals the true Cx = Cs*Sx/Ss = 10*10/20 = 5.000. The
error, percent difference between the true and measured
concentrations,
is zero. Now vary
Cx to other values and you'll see that the results remain perfect
for any value of Cx. Now vary Cs and you'll see that it also
have no effect, as long as it is not zero. Even "mo", the slope of the analytical
curve, also has no effect as long as it is not zero, because it
effect the signals of samples and standards equally.
Now let's make the
simulation a little more realistic by introducing some random
variability. There are two variables here, the random volumetric
error Ev, and the random signal error Es. The random volumetric
error refers to the random error in measuring volume or weights
when preparing the sample and standard solutions. The magnitude of
these errors depends on the technique used and on the solution
volumes involved. Then using accurate quantitative glassware
(volumetric flasks and pipettes) for volumes in the 10 mL - 1 L
range, a volumetric precision of 0.1% is achievable, but a very
small volumes below 1 mL a volumetric precision of 1% is
more likely. The signal measurement error refers to the
reproducibility of the signal output of the instrument, that is,
the signal-to-noise ratio. This varies greatly with the analytical
instrument type and the concentration level of the analyte. It may
be as good as 0.1% under optimum conditions, but is more likely to
be in the 1-10% range, especially at lower concentrations. The
signal measurement error, like the random volumetric error,
applies to both the sample and the standard. Both errors are
expressed in terms of the relative standard deviation (ratio of
the standard deviation to the mean).
For starters, set Ev = 1%
and Es = 1%. Now you'll see that the instrument readings Ss and Sx
are no longer exactly 20.000 and 10.000 as
before; they are a little off because of the effect of random
signal measurement error. If you click on the numbers for Ss
and Sx, and look at the entry bar at the top, you'll see the
equations for this numbers. Note that they both involve Es
because the same instrument is used to measure both Ss and
Sx. This causes the calculated sample concentration "result" to be a little off as well.
In fact, if you press the f9 function key at the top of your keyboard, it will
cause the spreadsheet to recalculate with different random
errors. You can see the Ss and Sx and result jumping around
slightly each time you press f9. (Also, the little triangles
on the graph move ever so slightly). But actually the spreadsheet
does this automatically, in the Statistics table.
The Statistics table, in the bottom left, computes the mean, the standard deviation, and the
percent relative standard deviation (% RSD) of 20 repeat
measurements (including both signal measurement and volumetric
error). Notice that the predicted % RSD of result (in cell C68) is actually larger
that the 1% RSD that you set for the random signal measurement
error Es.
Why? That's because Cs, Ss and Sx are subject to random errors: Cs is subject to random error
Ev and Ss and Sx are subject to random error Es. But the errors do not simply add up
linearly.
Theoretically, according to the
rules for mathematical error propagation, the % RSD of Cx is predicted
to be =SQRT((Es)^2+
(Es)^2+(Ev)^2)/100,
if the errors are independent and uncorrelated. If Es = Ev = 1.00,
as in this illustration, this works out to about 1.7%. This
is reported as the "Est. RSD". But this is the predicted standard deviation "on average", for a very large
number of repeats. Cell C72
gives the actual %
RSD of 20 simulated repeat experiments, which should turn out to
be somewhere around the Est. RSD, but not exactly because 20 repeats is not
really a sufficiently "large" number from a statistical point of
view. But
from an analytical laboratory of view, doing 20 repeats of an
analytical calibration is a lot of work, time, and expense.
Sometimes you can only afford to do 3 or 4 repeats, in which case
you'll get an experimental RSD even more approximate, possibly
differing from the predicted by a factor of 2 or 3.
This is a basic problem of statistics in analytical chemistry; the
theoretical predictions work well for very large number of
repeats, but in analytical chemistry the cost and time of doing
even a few repeats is often prohibitive).
Now let's introduce a
larger random error. Set Es = Ev = 5% and look at the % RSD of the
result. It's much larger than before -
theoretically 8.7% - because of the extra effect of Ev. But again
the actual results bounce around quite a bit as you press f9, in this case
mostly between 7
and 11%. What if you use accurate volumetric glassware (which can have an RSD of
0.1%) and a highly precise measurement technique that also gives a
0.1% RSD signal measurement precision)? Set Es = Ev = 0.1% and see
what you get for the % RSD of result.
Now let's make the
simulation even more realistic by introducing interferences. Set z to about 0.5, which causes
the analytical signal in the samples to be substantially
stronger than that in the standards (this is type of
multiplicative interference). Note that this causes the calculated
Cx to increase about 25% (as indicated by the Accuracy). Clearly, the single standard
method can not compensate for this type of interference. Note:
interferences are systematic errors that effect the
accuracy but not the precision (% RSD).
Return z to zero and set "blank" = 1.
This simulates an additive interference, such as a spectral
overlap or background interference. Note that this causes the
calculated Cx to be too high (Accuracy is about 10%).
Clearly, the single standard method can not compensate for
this type of interference either
Now test the
effect of analytical curve linearity. Return "blank" to zero.
Increase n,
the "Analytical curve non-linearity" and watch the analytical curve (blue
line) in the graph. As n increases, the curve
becomes concave down and the accuracy degrades as the curvature
increases, as indicated by the fact that the green triangle on the
graph (representing the calculated concentration of the unknown
sample) is no longer on top of the yellow triangle (representing the true
concentration). Clearly, the
single standard method depends on having a linear analytical
curve. But the problem is that, in the real world, you wouldn't
even have a clue that the analytical curve is non-linear if you
used only one standard. For that, you'd need to measure more than
a single standard.
The
Two-Standard
Bracket Method
Open Bracket.xlsx orBracketOO.ods. In this method the sample is
measured along with twostandard solutions that are (ideally)
close in concentration to the sample (typically one lower than and
one higher than the expected sample concentration). The
concentration of the sample Cx is calculated by linear
interpolation
between the two standards (cell C65). Note in the yellow table that
there are two entries for the concentrations of the two standard
solutions (called 1 and 2 in the Calc version
and a and b in the Excel version). The
closer the the two standards are together, the smaller the error
due to analytical curve non-linearity. Of course, this
assumes that know the sample concentrations beforehand, at least
approximately, in order to be able to make up appropriate
bracketing standards. (For this reason, the two-standard bracket method is
mostly used when the approximate range of unknown concentrations
is narrow and fairly well known, as in quality control
applications. It is not well suited when there are a large
number of samples of widely and unpredictable varying
concentrations. (In very careful, high-accuracy work, a
preliminary measurement is made based on the single-standard or
calibration curve method, then that result is used to prepare two
standards of slightly greater and slightly lower concentrations
for a second measurement by the bracket method). Start the
experiment with mo=2, blank=0, Ev and Es=0 and set z=0, n=0, Cx=5,
and C1s=4,3 and C2s=5.7. In this case (linear calibration curve, zero noise)
everything works perfectly.
Now, increase the
non-linearity (n) gradually and watch the shape of
the analytic curve (blue) change.
Note that the error (cell 66) stays fairly low, even as the
calibration curve becomes noticeably non-linear. Even when n=0.1, the error is less than
1%, compared to a 5% error for the single-standard method with
Cs=5.7. So the the two-standard
bracket method is effective in reducing, but not completely
eliminating, the non-linearity error. Try changing Cx
just outside
the range of the two standards; it still works pretty well as long
you don't get too far off. Cx does not actually have to fall
between the two
standards, just close to them.
Now set Ev and Es=1. Note that the predicted RSD (based on error-propagation
calculations) is greater than the measured RSD in the statistics section. This
is caused by the correlation between the terms in the expression
for sample concentration; simple error propagation math won't work
well in this case. Comparing the measured RSD of this method with that of the
previous (single standard) method, you can see that the two-standard
bracket method is very slightly less precise, because of the
random error in preparing and measuring two standards rather than
one, but this hardly matters if the analytical curve suffers from
a significant curve non-linearity that the bracket method can
compensate for.
The Calibration Curve Method
with Linear Curve Fit
OpenCalCurveOO.ods (view Screen
Shot). This simulates a calibration curve with 2 to 18 standard solutions and a
linear least-squares fit. This is probably the most common
calibration method in general use. It is laid out just like the
previous simulations, with a few additions. You can choose the
number of standards (ns) by typing into cell C57 or by clicking on the
arrowheads of the "spinner button" (Calc or Excel version).
Cs now controls the concentration of the highest standard solution. The
concentrations of
the other
standards are spaced out evenly between 0 and Cs.
The slope and intercept of the linear least-squares
fit to the calibration curve (the red line on the graph) is shown
in the computed results section, and the equation of the fit and
the R2 value (the "Coefficient of
Determination", sometimes called the "Correlation Coefficient") is
shown in the upper left of the graph. The R2 value is one way to estimate
the "goodness-of-fit" of the least-squares line to the data; it is
1.000 when the fit is perfect and less than 1.000 when the fit is
imperfect.
To start with, set mo=2,
blank=0, Ev and Es=0, and set z=0, n=0, Cx=5, and Cs=10. Now increase the non-linearity
(variable "n") to introduce a little non-linearity. As the
analytic curve becomes more curved, you can clearly see that the
linear least-squares fit no longer describes the curve well. Also,
you'll see the R2, which is 1.000 for a perfect
straight-line, begin to drop gradually, but R2 still reads 0.99 when the
curve is already severely non-linear and the error has already
begun to degrade seriously (see error in the Statistics table) to
about 7% error. Even an R2 value of 0.999 results in an
error of 2%. Maybe 2% sounds pretty good, and in some applications
that may be adequate, but sometimes analytical methods are called
upon to make measurements as accurate as 0.1% or even better. So
this tells us thatR2
must be expressed to several (3 or 4)
decimal places
for analytical calibration purposes.
Test this simulation also
for interference (variables "z" and "blank"); you'll see that it
is no better than the single standard method that that respect.
Set Ev and Es=1 to introduce a small random error. You'll see some small random scatter in
the calibration points, with some slightly above and some slightly below the "best fit"
line in red, and
the R2 value will dropslightly
below 1.0. Also the measured Cx ("result") will no longer be
exact. In the Statistics section, the entire calibration curve and
measurement procedure is repeated 20 times (not just 20 repeat
readings of the sample). With the conditions set the same as
before (mo=2,
blank=0, Ev and Es=1, z=0, n=0, Cx=5, and Cs=10, and ns=2) you'll notice that the %RSD
in the statistics section is slightly higher than Es and Ev
(around 1.4%). The increase is caused by the variability of the
calibration curve.
There is really no way to prepare a perfect calibration curve
without random error. But is is possible to reduce the reduce the
variability of
the computed slope and intercept of the calibration curve by using
more standards, thereby "averaging out" some of the random
variability. Try setting ns to 2 and then to 18. Note that
the measured Cx ("result") is more more accurate and that the %RSD
is also lower (about 1) with the higher number of standards. This is what you get in
return for all that extra work of preparing and running a larger
number of standards. Whether it's worth it or not depends on
the situation. Compared
to the single-standard method, the
calibration curve method give a slightly lower %RSD as long as the
number of standards is greater than 2, because a calibration based
on several standards is better than one based on a single
standard. However, the difference is not as much as you might
think, because the reading of the unknown signal Sx has the same
uncertainty as in the single standard method, and that uncertainty is not decreased by using more
standards.
How can we predict
how much random error we can expect in the result (Cx), without
performing a series of experiments or creating a simulation?The standard way to do this is
to perform a
propagation of error calculation on the least-squares slope and intercept and on
the equation that calculates
the sample concentration: namely Cx = (Sx-intercept)/slope. This
is done in the table D110:F119, and the result of this calculation is shown as
"Pred RSD" in cell C74. The
prediction is based only on a single calibration curve and is
good only insofar as that calibration curve is typical of others
that might be obtained in repeated trials. If your
random errors happen to be small
when you run your calibration curve, you'll get a deceptively good-looking calibration
curve, but then your estimates of the random error in the slope
and intercept will be too low.
If your random errors happen to be large, you'll get a deceptively bad-looking calibration
curve, but then your estimates of the random error in the slope
and intercept will be too high.
(Here are two examples taken from a set of 20 repeats, one "good" and one "bad", that illustrate this
point). Some days it just does not pay to be lucky.
One way to help this situation is to use more standards. Try
varying the
number of standards,
ns; you will
also discover that, if the number of standards is very small, the
agreement between the "Predicted % RSD" and the % RSD of 20 repeat
calibrations is
very poor. As the number of standards
increases, then agreement improves and the actual error decreases.
What's the minimum
number of standards needed? There is no hard and fast answer to
that question; it all depends on the quality of the data and the
required quality of results.
These simulated
experiments demonstrate two things: first, the predicted RSD (because it is
based on a single
calibration curve) is extremely unreliable when the number of
standards is small, and second, the %RSD of the result improves
slightly when the number of standards is increased greatly. We rightly expect
that the precision of measurement of concentration should improve
if more standards are used, but not so much as you might expect.
Looking at the expression for the sample concentration, Cx = (Sx-intercept)/slope,
the precision of
the slope and intercept are inversely proportional to the square
root of number
of standards, ns,
but
the precision of Sx does not depend on the number of standards.
For example, if we go from using 4 standards to using 16 standards
(4 times as many), the RSD the slope and intercept does decrease by half (the
square root of 4), but the RSD of calculated concentrations decreases only
from 1.5% to 1.2%. So, using a larger number of standards has some
benefits, but it may or may not be "worth it" considering the time
and expense of preparing and running more standards.
The Calibration Curve Method
with Non-Linear Curve Fit
Open CalCurveQuadFit.xlsx or CalCurveQuadFitOO.ods (view Screen Shot). This simulates a
calibration curve with multiple standards solutions
and a quadratic least-squares fit. Set the usual starting conditions: mo=2, blank=0, Ev and
Es=0 and set z=0, n=0, Cx=5, and Cs=10. Obviously in this
perfect linear case the results are essentially perfect (zero
standard deviation, almost perfect accuracy, and R2 =
1.000). Now increase the calibration
curve non-linearity, n, to about n=0.05 and compare
the error (in cell C66) with the error of the linear method (in
adjacent cell B67). You will find that this method is effective at
fitting moderate degrees of non-linearity, and (unlike the bracket method) it does so over the entire
range of concentrations (test this by varying the Cx slider). It
fails, however, if the analytical curve is too non-linear, especially if
it goes to a flat plateau or doubles back on itself. Try
increasing n all the way up to 0.1 and note the error is
not so low.
Another problem with non-linear fits occurs when there is lots of
random error (noise) in the data. Return n to 0.05 (half-way up) and set Ev and Es=1. With a
modest amount of random noise such as this, the quadratic fit
works pretty well. Compare the error (in cell C66) with the error of the
linear method (in adjacent cell B67). In this case, the
non-linearity is the dominant source of inaccuracy. Note
that the relative standard deviation of 20 repeat calibrations
(cell C72) is about 2%, a little higher than a linear calibration
curve with 10 standards (about 1.5%), but that's hardly a
deal-breaker if the error due to non-linearity is greater than
that due to random noise.
But now set Ev
and Es=5. Press the f9 key a few times to simulate different
calibration curves. Now the plot shows a good bit of discrepancy
between the actual analytical curve (blue) and the quadratic fit
to the data points (red). The curve fit does its best to fit
the data points, even if it has to weave a wavy line through and
between the points. With more random error, you can get some truly
strange fits in some cases.
The bottom line is that, if you know
from previous experience that the true calibration curve is
linear, then a linear fit will be better than a non-linear fit,
especially if the data are very noisy, because a non-linear fit will try to
"fit the noise", occasionally leading to very great errors.
If the calibration curve is clearly non-linear, and the potential
errors due to linear curve-fitting are greater than the random
errors due to noise, then a non-linear fit is a good choice. On
the other hand, a linear fit may be best with really noisy data, even if the calibration curve
is slightly non-linear, because the error caused by a non-linear
fit trying to
"fit the noise"
may exceed the error caused by a linear fits inability to fit the curve.
Reversed-axis fits (Optional):
The application of curve fitting to analytical calibration
requires that the fitting equation be solved for concentration as
a function of signal in order to be applied to the measurements of
unknown samples. This is trivial in the case of a linear
fit, and not so hard for a quadratic fit (requiring the use of the
well-known "quadratic equation" found in any algebra textbook),
but it becomes more difficult for higher-order polynomial fits.
One technique that is sometimes used in these cases is to reverse
the x and y axes, that is, to plot concentration on the y axis as
a function of signal on the x axis. This is not really
justified statistically, but is is nevertheless sometimes done in
practice because it avoids the need to solve the fitting
equation. For example, consider the quadratic fit: in a
normal quadratic fit (plotting concentration on the x axis and
signal on the y axis as usual), the concentration of unknowns is
calculated using the quadratic equation as Cx =
(-b+SQRT(b^2-4*a*(c-Sx)))/(2*a), where Sx is the signal given by
the unknown sample solution, and a, b, and c are the coefficients
from the quadratic least-square fit (quadratic, linear, and
intercept terms, respectively). If the axes are reversed
(plotting concentration on the y axis and signal on the x axis),
the concentration of unknowns is calculated by the simpler
expression Cx = ax^2+Bx+(c-Sx). The practical difference
between these two approaches is demonstrated by the spreadsheet NormalVsReversedQuadFit2.ods (Screen shot), which applies both
techniques to the same set of simulated calibration data. This
spreadsheet shows that the normal method is in fact slightly
better on average, although the difference is slight in most
cases, especially if the random errors in signal reading (Es) and
in concentration (Ev) are comparable. Admittedly, the
reversed-axis approach is really not needed for the quadratic
case. It us usually used only for cubic and higher-order fits,
where the difficulty of solving the fitting equation is much
greater; for example, CalCurveCubicFitOO.ods (Screen
shot) applies this
technique to a cubic (third-degree) calibration fit, and it could
be easily extended to even higher order polynomial fits, even
those for which the solution of the fitting equation is actually
mathematically impossible. A related
spreadsheet (ReversedQuadraticVsCubic.ods,
Screen shot) compares
the reversed quadratic and reversed cubic fits applied to the
same calibration data, showing that there is nothing significant
to be gained by going to a cubic fit, at least for the type of
non-linearity simulated here. On the other hand, the cubic
fit can be useful in some practical cases where the
non-linearity of the analytical curve is not well matched by a
quadratic fit; a common example is absorption spectroscopy (see
BeersLawCurveFit.html).
Technical
note: All
of these these non-linear curve fitting spreadsheets use the
LINEST function (common to Excel
and OpenOffice
Calc). For example, in cell B136 of CalCurveCubicFitOO.ods,
the syntax
is LINEST(E117:E126;B117:D126;0;0), where E117:E126
are the 10 concentrations of the standards, D117:D126
are the measured absorbances, C117:C126 are
the absorbances squared, and B117:B126 are
the absorbances cubed. (Important detail: Because this is
an array function,
rather than a normal function, when you enter this function into
the cell you have to press Ctrl-Shift-Enter
rather than just Enter).
The function returns the first-order coefficient (equivalent to
the slope) in cell B136 (the variable named "qa" in the
spreadsheet), the second-order coefficient in cell C137 (the
variable "qb"), and the third-order coefficient in cell D137
(the variable "qc"). The constant term is zero. These
coefficients are then used to compute the concentrations C of
unknown samples from their measured absorbance A: C
= qa*A+qb*A2+qc*A3.
In the Statistics section, this entire cubic calibration
procedure is repeated 20 times, in the 20 bordered blocks of
cells that extend to the right between rows 115 and 140 out to
column DP, and the results for each repeat are collected in the
Results table in column J.
The Single Standard Addition
Method
Open (SingleAddition.xlsx
or SingleStandardOO.ods (view Screen
Shot). In this
method, the sample is divided into two portions: one is measured
unmodified and the other is "doped" with the addition of a known
small volume of pure standard of known concentration and then the
mixture is measured. This is similar to the single standard
method, in that only the sample and a single standard are
measured, but the difference is that in this case the standard
solution is in the same matrix as the sample, so it is effected by the
same multiplicative interference, no matter what the origin of
that interference might be.
The downside of this method is that each separate sample requires
the preparation of its own standard, whereas in the other methods
one standard (or one set of standards) can be used to analyze a
whole series of different samples. Also, the calculations must
compensate for the fact that the concentration of the standard
solution now contains an unknown contribution from the unknown
sample, but this is easily taken care of by a little algebra. The
result is only that the equation used to calculate the unknown
concentration is little more complicated, Cx =
Sx*Vxx*Cs)/(Ss*(Vxx+Vss)-Sx*Vxx), than the equation for the single
standard method, Cx = Cs(Sx/Ss).
To test this method, set
mo=2, blank=0, Ev and Es=0 and set z=0, n=0, Cx=5, and Cs=10 as before. Now increase variable "z") to
introduce an increasingly severe multiplicative interference. You can see
the analytical curve changes slope as you do
this, but that both the sample signal (yellow triangle) and the
standard signal (green triangle) track this change, and so the
calculated sample concentration (red triangle) remains accurate.
Now try setting blank to 1
or 2, to test the affect of an additive interference.
Unfortunately, the standard addition method does not correct for additive
interferences, only for multiplicative interferences.
(You have to rely on other methods to compensate for additive
interferences, such asmultiwavelength
methods, wavelength
modulation,
derivative
methods, peak fitting, high-resolution
spectroscopy, separation methods, etc). Also, a linear analytical
curve is a requirement.
Set Ev and Es=1 to introduce a small random error. The predicted standard
deviation of Cx (Cell C70) is computed by breaking down the
equation for Cx into a series of differences, sums, products, and
ratios, and applying the rules for error propagation to each step. These error
propagation calculations are performed in cells D111:F118. Comparing the measured RSD of
this method with that of the single standard method, you can see that the
single standard addition method is less precise by about a factor
of 2, which might seem surprising considering that both methods
measure the unknown sample along with a single standard solution.
You can understand what is going on here by looking at the
expressions for Cx for the two methods: for the single standard
method, it is Cx=Cs*Sx/Ss; for the standard addition method, it is
Cx =
Sx*Vss*Cs)/(Ss*(Vxx+Vss)-Sx*Vxx). The extra volume terms Vss
and Vxx, both of which are subject to random volumetric errors, do
not occur in the single standard in the single standard method.
Moreover, the denominator is the difference between two noisy
quantities, Ss*(Vxx+Vss)
and Sx*Vxx,
which increases the relative standard deviation of the difference.
The result is that
the precision of standard addition is noticeably poorer than
the single standard method, but this the price for correcting for
multiplicative interference.
The Multiple Standard Addition Method
The
standard addition method can also be used with multiple standards:
(StandardAddition.xlsx 0r StandardAdditionOO.ods , view Screen
Shot). In this
method a series of aliquots of the sample solution are taken,
increasing amounts of standard material are added to each one, and
the signals from the resulting mixtures are measured and plotted
against the concentration of added standard. If the resulting
calibration curve is sufficiently linear, a first-order
least-squares fit of the data is computed. The sample
concentration is given by the negative of the x-axis intercept
(and to the ratio of the y-intercept to the slope). The advantage
over the single addition method is that you can verify the
linearity of the calibration curve.
To test
this method, keep the same conditions as before (mo=2, blank=0, Ev and Es=0,
z=0, n=0, Cx=5, and Cs=10) and set the number of standards ("ns")
to 4. You can see that the calibration curve is linear and that
the x-axis
intercept is exactly -5 (which agrees with the negative of Cx). Now increase the
interference (variable "z") to introduce an increasingly severe
multiplicative interference. You can see the analytical curve
changes slope as you do this, but that the x-axis intercept remains
unchanged, proving that this method corrects perfectly for
multiplicative interferences (slope changes). If change the
analyte concentration Cx, the whole curve slides up and down, so
that the x-axis intercept tracks the
changes in Cx.
Now
introduce some random error: set Ev and Es = 1%. The
calibration curve still looks pretty good, but as you change the
interference ("z") or press f9 to recalculate, the x-axis intercept changes
slightly, as does the "result" in cell C65. The predicted relative
standard deviation of Cx (cell C68) is the quadratic sum (square root of the sum of the squares)
of the relative standard deviations of the slope and intercept
computed by the curve fitting procedure. These error propagation
calculations are performed in cells B82:F87. Note that the %RSD of
20 repeats (cell C72) is about 2.6%, significantly greater than Ev or Es, and is only roughly
predicted by the Est. RSD (cell C68). However, if you increase the number of standards ("ns") to 16, the %RSD of 20 repeats is about
half that with ns=4 and is much better predicted by the Est. RSD
(both about 1.3%). As you saw before, in the linear
calibration curve method, the predicted RSD (because it is based on a single calibration curve) is
extremely unreliable when the number of standards is small, and secondly, the
%RSD of the result improves slightly when the number of standards is
increased greatly.
If you compare the
precision of this method to that of the linear calibration curve
method, you'll notice that the multiple standard method is poorer, even though
their expressions for Cx are very similar: Cx =
(Sx-intercept)/slope v. Cx = intercept/slope. Here again,
correlation between terms is significant: there is sufficient negative correlation between
the intercept and the slope in the multiple standard method (the
intercept goes down when the slope goes up and vice versa) that the relative standard deviation
(RSD) of the ratio of the two is
poorer than the square root of the sum of the squares of the relative standard deviations
of the two terms individually (as would be the case if they were
not correlated).
The
Bottom Line
The take-home lesson here is
two-fold:
1. Each calibration method has its own advantages and
disadvantages, compared in Table 1 below; there is not one
method that is best in all aspects and none that compensate or
eliminate all possible errors (none, for example, eliminate
additive interferences). As expected, the simplest methods do
the least; the more complex methods do more, but at a cost.
2. The random error (relative standard deviation) of the
measured concentrations (Table 2) is typically poorer (greater)
than that of the volumetric precision or the signal precision
alone, depending on the calibration method, but is usually no
more than twice (except for the single-addition method).
Table 3: Effect of number of standards for Linear
Calibration Curve
(Same conditions as above)
Number of standards
RSD of
slope
SD of
intercept
Predicted RSD
Measured
RSD
4
1.4
0.1
2
2
16
0.7
0.05
1.7
1.7
Student assignment for Standard Addition Method, WingZ version:
Wingz player
application and basic set of simulation modules, for windows PCs or Macintosh
The Single Standard
Addition Method (Old 1992 version)
Our textbook, Ingle and
Crouch, Chapter 6, page 179, says "The standard addition procedure
is a powerful technique that is often used improperly due to a
failure to understand the assumptions involved." This
simulation will help you appreciate the capabilities and
limitations of the standard addition procedure.
1. Open StandardAddition.wkz. This model
is based on the text, page 178-179 and Equation 6-16. The same
terminology is used, with the following modifications: Ss is used
for the signal measured after standard addition instead of Sx+s.
Cx means the true analyte concentration (the unknown in the
simulated experiment); the experimental quantity calculated by
equation Equation 6-16, which is supposed to be a measure of Cx,
is called "result". The volumes Vx and Vs mean the actual volumes
(including the random volumetric errors); nomVx and nomVs are the
"nominal" volumes, that is, the labeled volumes of the pipettes
and flasks.
2. The simulation includes
the effect of a multiplicative interference (Io = interferent
concentration) and additive interference, i.e. blank error (blank
= uncorrected blank signal), and random errors in volume and
signal measurement. Errors are assumed to be a fixed percentage of
the quantity measured (fixed relative error rather than fixed
absolute error). The analytical curve is assumed to be linear.
3. The following are the
independent variable that you can change:
mo
Analytical curve slope without interference
z
Interference factor (zero => no interference)
Io
Interferent concentration in original sample
Ev
Random volumetric error (% RSD )
Es
Signal measurement error (% RSD)
Cx
Analyte concentration in original sample solution
Cs
Analyte concentration of standard solution
blank
(Uncorrected) blank signal
nomVx
Nominal volume of sample solution before addition
nomVs
Nominal volume of standard added to sample
To change any of these,
click on the number (not on the symbol) in the spreadsheet, type a
new value, and press the enter key. The other quantities in the
spreadsheet are dependent variables that are calculated from these
independent variables. The most important of these is result,
which is the experimental estimate of Cx calculated by equation
Equation 6-16. In this simulation we will compare result to the
correct value Cx to see how well Equation 6-16 works.
4. Choose any value of Cx
and nomVx you like, then set Cs = ten-fold or so larger than Cx.
Start with the ideal case of no interference (Io = 0; blank
= 0) and no random errors (Ev = 0 and Es = 0). Verify that result
= Cx for arbitrary Cs, nomVx, and nomVs.
5. Introduce a
multiplicative interference by making Io > 0 and z > 0,
keeping blank = 0. (The recovery expresses by what percent the
analytical signal is changed by the interference). Does result =
Cx? Try arbitrary values of Io, z, Cx, Cs, nomVx, and nomVs and
notice the effect on result.
6. Introduce an additive
interference by making blank > 0. Compare result and Cx. What
do you conclude about the ability of the standard addition method
to compensate for additive and multiplicative interferences?
7. Introduce random errors
into the volumetric measurement (Ev) and the signal measurement
(Es). To start with make both 1% RSD (Ev = Es =1). Set Io > 0
and z > 0, keeping blank = 0 to simulate a multiplicative
interference only. Click on the 20 repeat runs button to simulate
20 separate standard addition measurements. (Quick repeat does the
same thing, only faster). The table on the right shows the result
of each measurement, and at the bottom computes the mean, standard
deviation (s), percent relative standard deviation, and the error
(% difference between the mean and Cx). Why is it that if you
perform several successive 20-run simulations under fixed
conditions, the standard deviation is the exactly the same each
time? How could the simulation be designed to make the standard
deviation more reproducible?
8. Vary Cs and nomVs and
observe the effect on the percent relative standard deviation of
the 20 repeats. Is there an optimum value of Cs and nomVs that
minimizes this error? On the basis of your observations, formulate
a rule that allows you to predict the optimum value of Cs and
nomVs.
9. Why is it that, even
under the best condition, the % RSD of result is greater than Es
or Ev? (c) T.C. O'Haver, 1992 (WingZ versions), 2009 (OpenOffice
versions). (c) 1991, 2015. This page is part of Interactive
Computer Models for Analytical Chemistry Instruction, created
and maintained by Prof.
Tom O'Haver , Professor Emeritus, The University of Maryland
at College Park. Comments, suggestions and questions should be
directed to Prof. O'Haver at toh@umd.edu.
Last updated August, 2014.
Number of unique visits since May
17, 2008:


 The
yellow table on the top left of the screen are independent
variables that you can change. Click on
The
yellow table on the top left of the screen are independent
variables that you can change. Click on the dark blue boldface numbers, type a new value and press the enter
key. In the OpenOffice Calc versions, some of these
variables can be controlled continuously by the sliders on the top
right; in the Excel versions, just type directly into these
cells. (The units of concentration in these simulations are
normalized to the range of 0 - 10 for convenience in entering and
plotting; you can think of them as mmoles/liter, µmoles/liter,
grams/liter or any other convenient unit (1 mmole = 0.001 moles; 1
µmole = 10-6 moles). Similarly, the signal units are
arbitrary for similar reasons).
the dark blue boldface numbers, type a new value and press the enter
key. In the OpenOffice Calc versions, some of these
variables can be controlled continuously by the sliders on the top
right; in the Excel versions, just type directly into these
cells. (The units of concentration in these simulations are
normalized to the range of 0 - 10 for convenience in entering and
plotting; you can think of them as mmoles/liter, µmoles/liter,
grams/liter or any other convenient unit (1 mmole = 0.001 moles; 1
µmole = 10-6 moles). Similarly, the signal units are
arbitrary for similar reasons).
 The graph
on the lower right shows the actual analytical curve (blue line)
over the concentration range from 0 to 10 (arbitrary units), with
the actual concentration of the unknown sample marked as a yellow
triangle. The red triangles are the standards. The green triangle
is the calculated concentration of the unknown sample according to
that calibration method. In the linear calibration curve and
multiple standard addition methods, the red line represents the
linear least-squares fit to the calibration curve. The graph
responds dynamically as you adjust the variables (e.g. with the
sliders).
The graph
on the lower right shows the actual analytical curve (blue line)
over the concentration range from 0 to 10 (arbitrary units), with
the actual concentration of the unknown sample marked as a yellow
triangle. The red triangles are the standards. The green triangle
is the calculated concentration of the unknown sample according to
that calibration method. In the linear calibration curve and
multiple standard addition methods, the red line represents the
linear least-squares fit to the calibration curve. The graph
responds dynamically as you adjust the variables (e.g. with the
sliders). The table
in the middle left of the screen, labeled "Computed results", are
dependent variables that are automatically calculated from
the independent variables (don't type in those cells or you will
delete the formulae). The most important dependent variable is
"result", which is a single simulated experimental measurement of
the analyte concentration Cx based on that calibration method.
The table
in the middle left of the screen, labeled "Computed results", are
dependent variables that are automatically calculated from
the independent variables (don't type in those cells or you will
delete the formulae). The most important dependent variable is
"result", which is a single simulated experimental measurement of
the analyte concentration Cx based on that calibration method. The "Statistics" section at the
lower left of the screen shows the mean, standard deviation, and %
relative standard deviation (%RSD) of 20 simulated repeat
calibrations and measurements of the unknown concentration Cx.
Here, a repeat calibration means that a complete set of new standards are prepared for
each repeat. This gives an idea of the reproducibility if the
entire procedure is repeated. The "% RSD" in the table is the
relative standard deviation of 20 repeated simulated
calibrations; it can be compared to the "Est. RSD" in the Computed
results table above, which is the predicted relative standard.
based on propagation or error rules. Both should
ideally be the same, but for a variety of reasons will
usually not agree exactly. The statistics are re-calculated each
time an input variable is changed or a slider is moved.
The "Statistics" section at the
lower left of the screen shows the mean, standard deviation, and %
relative standard deviation (%RSD) of 20 simulated repeat
calibrations and measurements of the unknown concentration Cx.
Here, a repeat calibration means that a complete set of new standards are prepared for
each repeat. This gives an idea of the reproducibility if the
entire procedure is repeated. The "% RSD" in the table is the
relative standard deviation of 20 repeated simulated
calibrations; it can be compared to the "Est. RSD" in the Computed
results table above, which is the predicted relative standard.
based on propagation or error rules. Both should
ideally be the same, but for a variety of reasons will
usually not agree exactly. The statistics are re-calculated each
time an input variable is changed or a slider is moved. 


 exactly 20.000 and 10.000 as
before; they are a little off because of the effect of random
signal measurement error. If you click on the numbers for Ss
and Sx, and look at the entry bar at the top, you'll see the
equations for this numbers. Note that they both involve Es
because the same instrument is used to measure both Ss and
Sx. This causes the calculated sample concentration "result" to be a little off as well.
In fact, if you press the
exactly 20.000 and 10.000 as
before; they are a little off because of the effect of random
signal measurement error. If you click on the numbers for Ss
and Sx, and look at the entry bar at the top, you'll see the
equations for this numbers. Note that they both involve Es
because the same instrument is used to measure both Ss and
Sx. This causes the calculated sample concentration "result" to be a little off as well.
In fact, if you press the  It's much larger than before -
theoretically 8.7% - because of the extra effect of Ev. But again
the actual results bounce around quite a bit as you press f9, in this case
mostly between 7
and 11%. What if you use accurate volumetric glassware (which can have an RSD of
0.1%) and a highly precise measurement technique that also gives a
0.1% RSD signal measurement precision)? Set Es = Ev = 0.1% and see
what you get for the % RSD of result.
It's much larger than before -
theoretically 8.7% - because of the extra effect of Ev. But again
the actual results bounce around quite a bit as you press f9, in this case
mostly between 7
and 11%. What if you use accurate volumetric glassware (which can have an RSD of
0.1%) and a highly precise measurement technique that also gives a
0.1% RSD signal measurement precision)? Set Es = Ev = 0.1% and see
what you get for the % RSD of result. samples to be substantially
stronger than that in the standards (this is type of
multiplicative interference). Note that this causes the calculated
Cx to increase about 25% (as indicated by the Accuracy). Clearly, the single standard
method can not compensate for this type of interference. Note:
interferences are systematic errors that effect the
accuracy but not the precision (% RSD).
samples to be substantially
stronger than that in the standards (this is type of
multiplicative interference). Note that this causes the calculated
Cx to increase about 25% (as indicated by the Accuracy). Clearly, the single standard
method can not compensate for this type of interference. Note:
interferences are systematic errors that effect the
accuracy but not the precision (% RSD). Now test the
effect of analytical curve linearity. Return "blank" to zero.
Now test the
effect of analytical curve linearity. Return "blank" to zero.
 Increase n,
the "Analytical curve non-linearity" and watch the analytical curve (blue
line) in the graph. As n increases, the curve
becomes concave down and the accuracy degrades as the curvature
increases, as indicated by the fact that the green triangle on the
graph (representing the calculated concentration of the unknown
sample) is no longer on top of the yellow triangle (representing the true
concentration). Clearly, the
single standard method depends on having a linear analytical
curve. But the problem is that, in the real world, you wouldn't
even have a clue that the analytical curve is non-linear if you
used only one standard. For that, you'd need to measure more than
a single standard.
Increase n,
the "Analytical curve non-linearity" and watch the analytical curve (blue
line) in the graph. As n increases, the curve
becomes concave down and the accuracy degrades as the curvature
increases, as indicated by the fact that the green triangle on the
graph (representing the calculated concentration of the unknown
sample) is no longer on top of the yellow triangle (representing the true
concentration). Clearly, the
single standard method depends on having a linear analytical
curve. But the problem is that, in the real world, you wouldn't
even have a clue that the analytical curve is non-linear if you
used only one standard. For that, you'd need to measure more than
a single standard. solutions that are (ideally)
close in concentration to the sample (typically one lower than and
one higher than the expected sample concentration). The
concentration of the sample Cx is calculated by linear
interpolation
between the two standards (cell C65). Note in the yellow table that
there are two entries for the concentrations of the two standard
solutions (called 1 and 2 in the Calc version
and a and b in the Excel version). The
closer the the two standards are together, the smaller the error
due to analytical curve non-linearity. Of course, this
assumes that know the sample concentrations beforehand, at least
approximately, in order to be able to make up appropriate
bracketing standards. (For this reason, the two-standard bracket method is
mostly used when the approximate range of unknown concentrations
is narrow and fairly well known, as in quality control
applications. It is not well suited when there are a large
number of samples of widely and unpredictable varying
concentrations. (In very careful, high-accuracy work, a
preliminary measurement is made based on the single-standard or
calibration curve method, then that result is used to prepare two
standards of slightly greater and slightly lower concentrations
for a second measurement by the bracket method).
solutions that are (ideally)
close in concentration to the sample (typically one lower than and
one higher than the expected sample concentration). The
concentration of the sample Cx is calculated by linear
interpolation
between the two standards (cell C65). Note in the yellow table that
there are two entries for the concentrations of the two standard
solutions (called 1 and 2 in the Calc version
and a and b in the Excel version). The
closer the the two standards are together, the smaller the error
due to analytical curve non-linearity. Of course, this
assumes that know the sample concentrations beforehand, at least
approximately, in order to be able to make up appropriate
bracketing standards. (For this reason, the two-standard bracket method is
mostly used when the approximate range of unknown concentrations
is narrow and fairly well known, as in quality control
applications. It is not well suited when there are a large
number of samples of widely and unpredictable varying
concentrations. (In very careful, high-accuracy work, a
preliminary measurement is made based on the single-standard or
calibration curve method, then that result is used to prepare two
standards of slightly greater and slightly lower concentrations
for a second measurement by the bracket method). Now, increase the
non-linearity (n) gradually and watch the shape of
the
Now, increase the
non-linearity (n) gradually and watch the shape of
the solutions and a
linear least-squares fit. This is probably the most common
calibration method in general use. It is laid out just like the
previous simulations, with a few additions. You can choose the
number of standards (ns) by typing into cell C57 or by clicking on the
arrowheads of the "spinner button" (Calc or Excel version).
Cs now controls the concentration of the highest standard solution. The
concentrations of
the other
standards are spaced out evenly between 0 and Cs.
solutions and a
linear least-squares fit. This is probably the most common
calibration method in general use. It is laid out just like the
previous simulations, with a few additions. You can choose the
number of standards (ns) by typing into cell C57 or by clicking on the
arrowheads of the "spinner button" (Calc or Excel version).
Cs now controls the concentration of the highest standard solution. The
concentrations of
the other
standards are spaced out evenly between 0 and Cs. The slope and intercept of the linear least-squares
fit to the calibration curve (the red line on the graph) is shown
in the computed results section, and the equation of the fit and
the R2 value (the "Coefficient of
Determination", sometimes called the "Correlation Coefficient") is
shown in the upper left of the graph. The R2 value is one way to estimate
the "goodness-of-fit" of the least-squares line to the data; it is
1.000 when the fit is perfect and less than 1.000 when the fit is
imperfect.
The slope and intercept of the linear least-squares
fit to the calibration curve (the red line on the graph) is shown
in the computed results section, and the equation of the fit and
the R2 value (the "Coefficient of
Determination", sometimes called the "Correlation Coefficient") is
shown in the upper left of the graph. The R2 value is one way to estimate
the "goodness-of-fit" of the least-squares line to the data; it is
1.000 when the fit is perfect and less than 1.000 when the fit is
imperfect. 
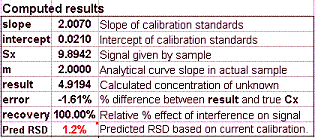 the sample concentration: namely Cx = (Sx-intercept)/slope. This
is done in the table D110:F119, and the result of this calculation is shown as
"Pred RSD" in cell C74. The
prediction is based only on a single calibration curve and is
good only insofar as that calibration curve is typical of others
that might be obtained in repeated trials. If your
random errors happen to be small
when you run your calibration curve, you'll get a deceptively good-looking calibration
curve, but then your estimates of the random error in the slope
and intercept will be too low.
If your random errors happen to be large, you'll get a deceptively bad-looking calibration
curve, but then your estimates of the random error in the slope
and intercept will be too high.
(Here are two examples taken from a set of 20 repeats, one "good" and one "bad", that illustrate this
point). Some days it just does not pay to be lucky.
the sample concentration: namely Cx = (Sx-intercept)/slope. This
is done in the table D110:F119, and the result of this calculation is shown as
"Pred RSD" in cell C74. The
prediction is based only on a single calibration curve and is
good only insofar as that calibration curve is typical of others
that might be obtained in repeated trials. If your
random errors happen to be small
when you run your calibration curve, you'll get a deceptively good-looking calibration
curve, but then your estimates of the random error in the slope
and intercept will be too low.
If your random errors happen to be large, you'll get a deceptively bad-looking calibration
curve, but then your estimates of the random error in the slope
and intercept will be too high.
(Here are two examples taken from a set of 20 repeats, one "good" and one "bad", that illustrate this
point). Some days it just does not pay to be lucky. solutions
and a quadratic least-squares fit. Set the usual starting conditions: mo=2, blank=0, Ev and
Es=0 and set z=0, n=0, Cx=5, and Cs=10. Obviously in this
perfect linear case the results are essentially perfect (zero
standard deviation, almost perfect accuracy, and R2 =
1.000).
solutions
and a quadratic least-squares fit. Set the usual starting conditions: mo=2, blank=0, Ev and
Es=0 and set z=0, n=0, Cx=5, and Cs=10. Obviously in this
perfect linear case the results are essentially perfect (zero
standard deviation, almost perfect accuracy, and R2 =
1.000).  In this
method, the sample is divided into two portions: one is measured
unmodified and the other is "doped" with the addition of a known
small volume of pure standard of known concentration and then the
mixture is measured. This is similar to the single standard
method, in that only the sample and a single standard are
measured, but the difference is that in this case the standard
solution is in the same matrix as the sample, so it is effected by the
same multiplicative interference, no matter what the origin of
that interference might be.
In this
method, the sample is divided into two portions: one is measured
unmodified and the other is "doped" with the addition of a known
small volume of pure standard of known concentration and then the
mixture is measured. This is similar to the single standard
method, in that only the sample and a single standard are
measured, but the difference is that in this case the standard
solution is in the same matrix as the sample, so it is effected by the
same multiplicative interference, no matter what the origin of
that interference might be.  You can see
the analytical curve changes slope as you do
this, but that both the sample signal (yellow triangle) and the
standard signal (green triangle) track this change, and so the
calculated sample concentration (red triangle) remains accurate.
You can see
the analytical curve changes slope as you do
this, but that both the sample signal (yellow triangle) and the
standard signal (green triangle) track this change, and so the
calculated sample concentration (red triangle) remains accurate.  The
standard addition method can also be used with multiple standards:
(StandardAddition.xlsx 0r StandardAdditionOO.ods , view Screen
Shot). In this
method a series of aliquots of the sample solution are taken,
increasing amounts of standard material are added to each one, and
the signals from the resulting mixtures are measured and plotted
against the concentration of added standard. If the resulting
calibration curve is sufficiently linear, a first-order
least-squares fit of the data is computed. The sample
concentration is given by the negative of the x-axis intercept
(and to the ratio of the y-intercept to the slope). The advantage
over the single addition method is that you can verify the
linearity of the calibration curve.
The
standard addition method can also be used with multiple standards:
(StandardAddition.xlsx 0r StandardAdditionOO.ods , view Screen
Shot). In this
method a series of aliquots of the sample solution are taken,
increasing amounts of standard material are added to each one, and
the signals from the resulting mixtures are measured and plotted
against the concentration of added standard. If the resulting
calibration curve is sufficiently linear, a first-order
least-squares fit of the data is computed. The sample
concentration is given by the negative of the x-axis intercept
(and to the ratio of the y-intercept to the slope). The advantage
over the single addition method is that you can verify the
linearity of the calibration curve. To test
this method, keep the same conditions as before (mo=2, blank=0, Ev and Es=0,
z=0, n=0, Cx=5, and Cs=10) and set the number of standards ("ns")
to 4. You can see that the calibration curve is linear and that
the x-axis
intercept is exactly -5 (which agrees with the negative of Cx). Now increase the
interference (variable "z") to introduce an increasingly severe
multiplicative interference. You can see the analytical curve
changes slope as you do this, but that the x-axis intercept remains
unchanged, proving that this method corrects perfectly for
multiplicative interferences (slope changes). If change the
analyte concentration Cx, the whole curve slides up and down, so
that the x-axis intercept tracks the
changes in Cx.
To test
this method, keep the same conditions as before (mo=2, blank=0, Ev and Es=0,
z=0, n=0, Cx=5, and Cs=10) and set the number of standards ("ns")
to 4. You can see that the calibration curve is linear and that
the x-axis
intercept is exactly -5 (which agrees with the negative of Cx). Now increase the
interference (variable "z") to introduce an increasingly severe
multiplicative interference. You can see the analytical curve
changes slope as you do this, but that the x-axis intercept remains
unchanged, proving that this method corrects perfectly for
multiplicative interferences (slope changes). If change the
analyte concentration Cx, the whole curve slides up and down, so
that the x-axis intercept tracks the
changes in Cx.  Now
introduce some random error: set Ev and Es = 1%. The
calibration curve still looks pretty good, but as you change the
interference ("z") or press f9 to recalculate, the x-axis intercept changes
slightly, as does the "result" in cell C65. The predicted relative
standard deviation of Cx (cell C68) is the quadratic sum (square root of the sum of the squares)
of the relative standard deviations of the slope and intercept
computed by the curve fitting procedure. These error propagation
calculations are performed in cells B82:F87. Note that the %RSD of
20 repeats (cell C72) is about 2.6%, significantly greater than Ev or Es, and is only roughly
predicted by the Est. RSD (cell C68). However, if you increase the number of standards ("ns") to 16, the %RSD of 20 repeats is about
half that with ns=4 and is much better predicted by the Est. RSD
(both about 1.3%). As you saw before, in the linear
calibration curve method, the predicted RSD (because it is based on a single calibration curve) is
extremely unreliable when the number of standards is s
Now
introduce some random error: set Ev and Es = 1%. The
calibration curve still looks pretty good, but as you change the
interference ("z") or press f9 to recalculate, the x-axis intercept changes
slightly, as does the "result" in cell C65. The predicted relative
standard deviation of Cx (cell C68) is the quadratic sum (square root of the sum of the squares)
of the relative standard deviations of the slope and intercept
computed by the curve fitting procedure. These error propagation
calculations are performed in cells B82:F87. Note that the %RSD of
20 repeats (cell C72) is about 2.6%, significantly greater than Ev or Es, and is only roughly
predicted by the Est. RSD (cell C68). However, if you increase the number of standards ("ns") to 16, the %RSD of 20 repeats is about
half that with ns=4 and is much better predicted by the Est. RSD
(both about 1.3%). As you saw before, in the linear
calibration curve method, the predicted RSD (because it is based on a single calibration curve) is
extremely unreliable when the number of standards is s