


Step-by-Step Instructions for using ipf
1. Make sure the latest version of ipf.m
is in the Matlab path (version 13.4, as of June 2021). Use the
Matlab load or File > Import data
command to get your data into the Matlab workspace
as single
vector, a pair of vectors (x and y), or a matrix with the independent variable (x)
in the first column and the dependent variable (y) in the
second column (e.g. "mydata"). If you are using
Octave instead of Matlab, use the Octave version, which uses different
keys for pan and zoom. Press the K key to list the
keystroke commands.
2. Type ipf(y); or ipf(x,y); or ipf(mydata);
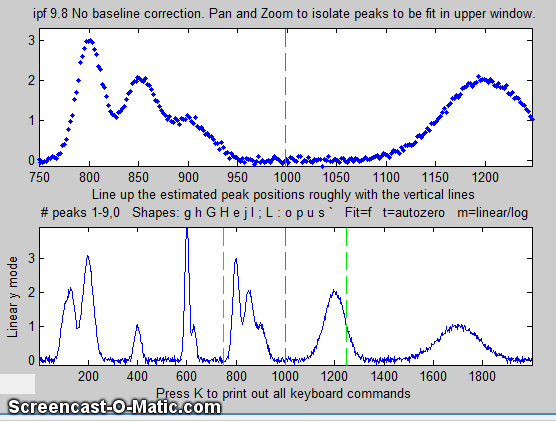
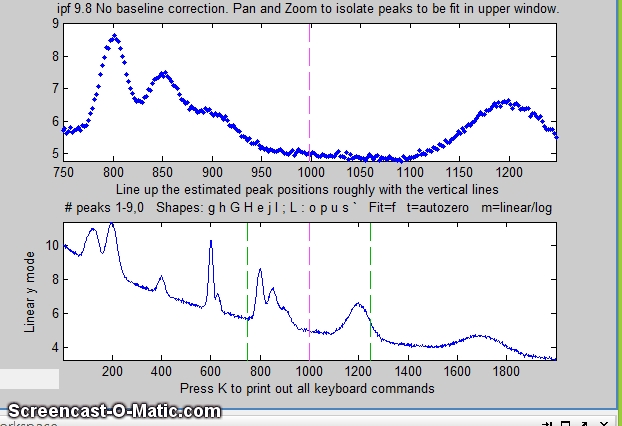
3. Matlab displays the data in the Figure window, with the
entire signal in the lower panel and a zoomed-in section in the
top panel. (In the figure below, the data are from the demo
script Demoipf.m.
To use those data, download Demoipf.m, place it in the Matlab
path, and type "Demoipf" at the command prompt; the "true"
values of the peaks without noise are printed out in the command
window for comparison to your results). Note: Make sure you
don't click on the "Show Plot Tools"button in the toolbar
above the figure; that will disable normal program
functioning. If you do; close the Figure window and start
again.
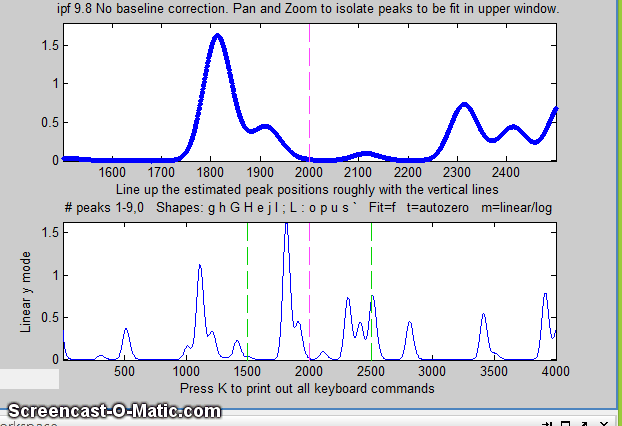
4. Use the left and right cursor keys to
pan back and forth across the signal...
To pan faster, use the <
and > keys. To pan by one point, use the [
and ] keys.
Use the up and down cursor
keys to zoom in and out.
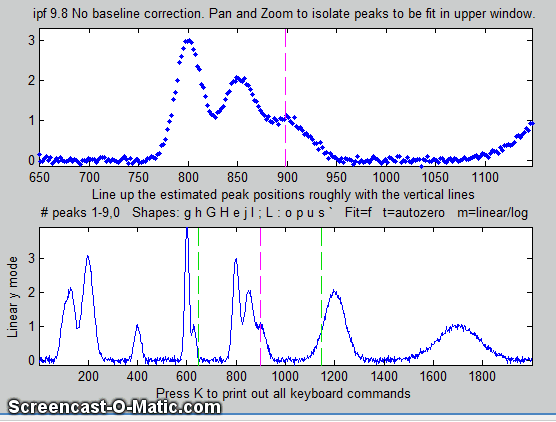
To zoom faster, use the / and ' keys.
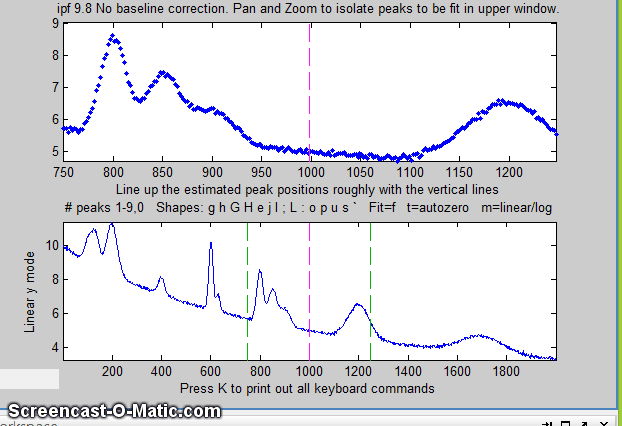
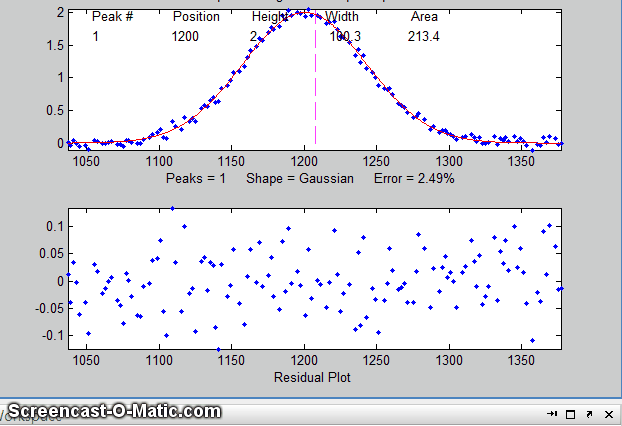
5. To fit a peak, isolate and center that peak in the upper
window, ....

6. ... select the number of peaks by pressing a number key
between 1 and 9 (1 in this case), select the peak shape (G
= Gaussian in this case), and press F (for Fit).
In version 13.2, the center of the graph displays "Working..."
while the fit is in progress.

The best-fit line is shown in red in the upper panel,
superimposed on the data points. A table listing the peak
position, height, width, and area of each separate component of
the best fit model is displayed either in the top panel (earlier
versions of ipf.m) or in the bottom panel (later versions).
The bottom panel displays the residuals (difference between the
best-fit line and the data). The current number of peaks, the
shape, the percent fitting error (and, in later versions, the R2
value) are all shown at the bottom of the window. Press the R
key to print out the table of results in the command window.
7. Press the F key again to
compute another fit with slightly different starting first
guesses. This will show how stable the fit is with respect
to variations in starting points (first guesses). Press R to print a report of the best-fit peak
parameters in the command window. For example:
Shape= Gaussian %
Fitting Error= 2.31% R2= 0.995
Peak#
Position Height
Width Area
1
1200 2.0196
99.191 213.24
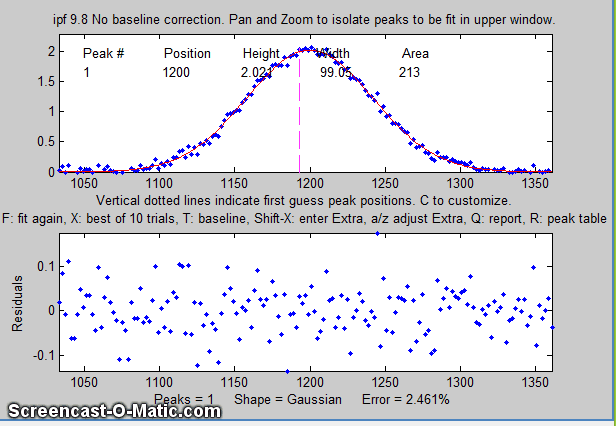
The percent fitting error are refreshed at the bottom of the
window.
In ipf.m version 13 (November 2017), there are 24 different
peaks shapes are available by keystroke (e.g. L=Lorentzian,
U=exponential pulse, S=sigmoid (logistic
function), etc). Press K to see a list of all commands.
You can also select the shape by number from an even larger
menu of 49 shapes by pressing the - (minus) key
and selecting the shape by number.
8. Here's another example using the same signal: to fit the
group of three overlapping peaks near x=800, press the 3
key, use the pan and zoom to isolate that group and try to line
up the peaks with the magenta dotted vertical line markers
(which mark the staring guess for the position of the three
peaks), then press F.
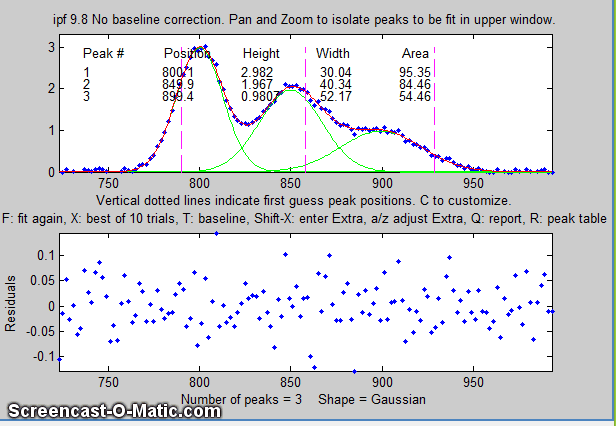
Each time you press F the fit is repeated with
slightly different starting first guesses. Keep your eye on
the fitting error and stop when the error is low. The
green lines in the upper panel show the individual
model components; the red line is the sum of those
components.
9. If the fit seems unstable, press the X key to perform
10 silent fits and display the one with the lowest fitting
error. In version 13.2, the center of the graph displays
"Working..." while the fit is in progress. (Press R to
print a report of the best-fit peak parameters in the command
window.
% Fitting Error=1.6439% Elapsed time=1.3387 sec.
Peak# Position
Height Width Area
1
800.15 3.0067 29.995
96.001
2
849.71 1.9867 39.633
83.814
3 899.4
1.0122 51.476 55.462
10. If the peaks don't line up roughly under the
magenta dotted vertical lines, you can manually specify
customized first-guess peak positions: press C,
then click on your estimates of the peak positions in the upper
graph, once for each peak. A fit is automatically performed
after the last click. Peaks are numbered in the order clicked.

11. In the figure below, using data from the demo script Demoipf2.m, the peaks are superimposed
on a gradual curving baseline. To correct for the baseline, use
the T key to cycle between the four baseline correction
("autozero") modes: None, Linear, Quadratic,
and Flat. Pan and zoom each group of peaks so that the
signal returns to the local baseline at the edges of the
selected region in the upper panel, then press F. In the
sequence shown below, a pair of peaks near x=600 is selected and
fit, first without baseline subtraction, then with linear,
and then quadratic, baseline correction. The latter two
modes work best in this case.
The current baseline correction mode is displayed at the
top of the window.
12. Alternatively, you may use multipoint background correction
to subtract a linearly-interpolated baseline for the entire
signal: press the Backspace key, type in the desired
number of background points (14 in the example below) and press
the Enter key, then click where you estimate the
baseline to be in the lower panel, starting at the left of the
lowest x-value and ending to the right of the highest x-value.
(For greatest precision, you can maximize the figure window
before this operation). After the last click, the baseline is
subtracted; then you can continue with curve fitting. (If you
mess up, press the "\" key to restore the original
background and start over). When you are done, you can measure
the peaks without baseline subtraction.
The y-axis label of the bottom panel changes accordingly.
13. Some peak shapes have an extra variable
parameter that modifies the shape: the Voigt profile,
Pearson, exponentially-broadened Gaussian (ExpGaussian),
exponentially-broadened Lorentzian (ExpLorentzian), bifurcated
Gaussian, bifurcated Lorentzian, or Gaussian/Lorentzian blend.
For those shapes, you control that extra variable parameter with
the A and Z keys and adjust it to minimize the
fitting error. The current value is displayed at the bottom of
the window. In this example, the single peak near x=2800 in the
file "DataMatrix3" is fit, first with a Gaussian and
then with an exponentially broadened Gaussian (E
key), adjusting the extra parameter (the time constant)
to minimize the fitting error.
>> load DataMatrix3
>> ipf(DataMatrix3)
14. Press Q to print out a report in the command window.
Peak Shape = Exponentially-broadened Gaussian
No baseline correction
Number of peaks = 2
Time Constant = 33.1919
Fitted x range = 1663.5 - 2050.5
Percent Fitting Error = 0.090216%
Peak# Position
Height Width Area
1
1800.4 1.8632 60.057
119.11
2
1900.6 0.48346
59.62 30.67
15. To test the stability of your fit with respect to random
noise, press the N key a few times. That will perform
fits on subsets of data points (called "bootstrap samples").
If the N key gives reasonable-looking fits with peak
parameters that vary somewhat from trial to trial, then you can
determine the variability of the peak position, height, width,
and area by pressing the V key, which will calculate the
standard deviation of all the peak parameters of all the peaks
in 100 such bootstrap sub-samples (this may take a minute or
so). You will be asked for the number of trials per bootstrap
sample; start with 1 and increase it if the fit is not
stable. If the N key gives wildly different fits, with highly
variable fitting errors and peak parameters, then the fit is not
stable, and you should try to increase the number of trials when
asked (but of course that will increase the time it takes to
complete). In version 13.2 and later, the center of the graph
displays "Working..." while the fit is in progress..
Number of fit trials per bootstrap sample (0 to cancel): 1
Peak #1 Position
Height Width
Area
Mean: 1200.00
1.99677 100.3149 213.201
STD:
0.1832 0.00595
0.37247 0.7652
STD (IQR): 0.18681
0.00605 0.37384 0.7563
%RSD: 0.01526
0.29831 0.3713 0.358
%RSD(IQR): 0.01506
0.2985 0.37216
0.3599
Elapsed time is 3.060255 seconds.
..and
so on for Peak #2 and the other peaks if a multi-peak fit.
If the RSD and the RSD (IQR) are roughly the same (as in
the example above), then the distribution of bootstrap fitting
results is close to normal and the fit is stable. If the RSD is
substantially greater than RSD (IQR), then the RSD is
biased high by "outliers" (obliviously erroneous fits that fall
far from the norm), and in that case you should use the RSD
(IQR) rather than the RSD, because the IQR is much less
influenced by outliers. Alternatively, you could use another
model or a different data set to see if that gives more stable
fits.
Difference between in the F, X, N, and V
keys:
- F key: Slightly varies the starting
values (peak positions, widths, etc) and performs a single
iterative fit using all the data points in the selected
region.
- X key: Performs 10 iterative trial
fits using all the data points in the selected region.,
slightly varying the starting values (peak positions,
widths, etc) before each trial, then takes the one with
the lowest fitting error. Press it again to refine the
fit. This takes about 10 times longer than the F key.
- N key: Slightly varies the starting
values and performs a single fit using a random subset of
the data points in the selected region. Use this to
visualize the stability of the fit with respect to random
noise. Takes the same time as the F key.
- V key: Asks for a number of trial fits, then
performs 100 fits each on a separate random subset of the
data points in the selected region., each fit using the
specified number of trials and taking the best one, then
calculates the mean and standard deviation of the peak
parameters of all 100 best-fit results. Use
to quantify the stability of peak parameters with respect to
random noise. Takes about 100 times longer than the X
key.
16. Press K
to display the complete set of keystroke commands. Click here
for more details.
This page is part of "A
Pragmatic Introduction to Signal Processing", created
and maintained by Prof.
Tom O'Haver , Department of Chemistry and Biochemistry, The
University of Maryland at College Park. Comments, suggestions and
questions should be directed to Prof. O'Haver at toh@umd.edu.
Last updated, March, 2023
Website created with SeaMonkey.