Now, that we have established who our customer is and what her needs are, as well as laid out an approach, it is important to know how the work was divided and the initial drawing package produced. The group determined that the most efficient way to draw the entire wheelchair in Pro/ENGINEER was to break the chair into three parts and have small teams of two work on each part. The following section will include: points of interest in the drawings, difficulties confronted and drawing approaches used.
The first team
faced the task of entering the frame and cross members of the wheelchair
into Pro/ENGINEER. To prepare for this extensive task, the wheelchair
was disassembled and the frame was extracted from the large and small wheel
assemblies and from the bottom and back of the seat. It is important to
note that, while many of the shafts are welded together, the frame also
consisted of many individual straight and curved pipes. Using calipers,
rulers and a tape measure, the dimensions of the original frame were recorded
on a hand drawn sketch of the chair. Each individual section of the
frame was labeled with a number so the part could be saved as that number
and easily referred to later using the hand drawn sketch. There were
at least seventeen individual parts in the frame with two of those parts
consisting of three-part assemblies.
Once all of
the dimensions were recorded and the total dimensions were verified to
ensure all accurancy, the modeling process began. Each member of
this team modeled half of the frame components and used a consistent part
naming system. For example, the pipe consisting of the wheelchair
handle was part number one and was therefore saved as chair_1.
The curved
pipes were easily constructed in Pro/ENGINEER using the Sweep command.
It was sometimes difficult to obtain the correct trajectory, but the cross
section for all of the shafts in the frame is the same. For many
of the other parts it was necessary to simply copy an existing cylinder
created for a different shaft and modify the length according to the new
specifications.
Once the individual
drawings of each component were completed the assembly could begin.
The sub-assembly Mooda.asm consisted of only the side frame and then a
larger assembly included all of the cross members connecting the frames.
Figure 3.1 shows the solid model view of the original wheelchair frame.
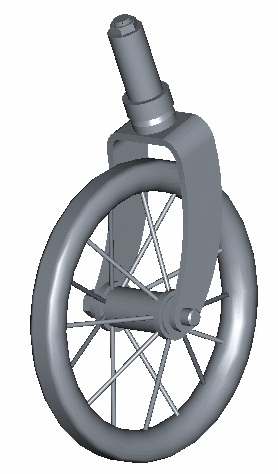
This team was
responsible for drawing and assembling the small wheel and its components
in Pro/ENGINEER. This task was accomplished by the disassembling
the parts of the wheelchair and measuring the features. In drawing
the components for the small wheel assembly this team was presented with
interesting obstacles. For instance, to draw the spokes a point to point
sweep using sketch trajectory and feature copy was used. Also, the
dimensions of the fork geometry included irregular angles and curves making
the drawing complex.
The welding capabilities of Assembly Mode in Pro/ENGINEER
were utilized in assembling the fork and its other components. Finally,
the wheel was assembled to the fork using a bolt retrieved from a Pro/ENGINEER
library. Below is the original small wheel assembly.
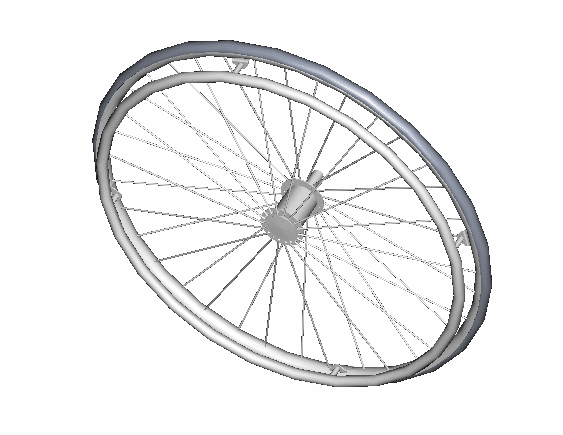
This team was responsible for the large wheel assembly. This task entailed drawing the wheel, rim, tire, handgrip hoop, spokes, hub and bearings of the large wheel. Drawing the spokes on the large wheel was one of the most difficult tasks encountered in creating the drawings of the original chair in Pro/ENGINEER. There are two sets of spokes attached to the rim, one attached to each side of the hub. Additionally, the set of spokes on each side is angled so that is does not connect from the hub to the rim in a direct line as a radius would. The geometry of the spokes and the nature of their connection to the hub presented an interesting task that was solved using the Sweep and Copy Group capabilities in Pro/ENGINEER.