Statement: A designer of mechanical engineering
needs the knowledge of tolerancing. An appropriate selection
of tolerance(s) for a dimension is important. Two real life problems
are presented in this exercise. In addition, one problem related
to the integration of CAD/CAM systems is also presented.
Problem 1
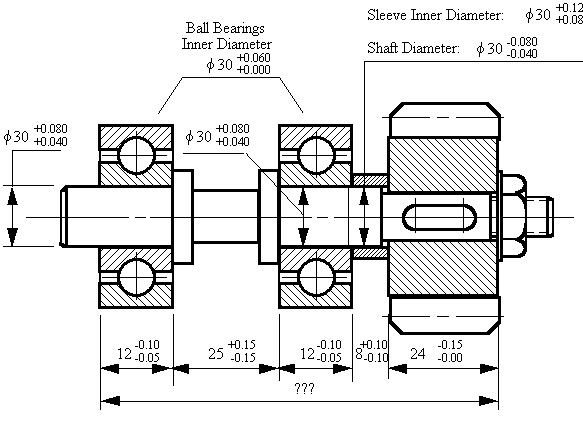
The following drawing is an assembly of a gear-shaft-bearing
structure. There are 8 components in the assembly. Tolerancing
specifications of the two ball bearings, shaft, sleeve and gear
are given. Numerical values are shown in the figure.
1. Fill the maximum and minimum dimensions,
and the tolerance for each of those components listed below:
Component Max. Dimension Min. Dimension Tolerance
------------------------------------------------------------------------------------------------------
Bearing 1
Bearing 2
Shaft
Part 1
Part 2
Sleeve
Gear
-----------------------------------------------------------------------------------------------------
2. Graphically describe the relative distribution
of these dimensions.
Diameter 30 _____________________________________________________
3. Does the tolerancing distribution follow the hole basis system, or the shaft basis system? Why?
4. Evaluate the maximum and minimum dimensions,
and the tolerance of the total length of the assembly.

Problem 2
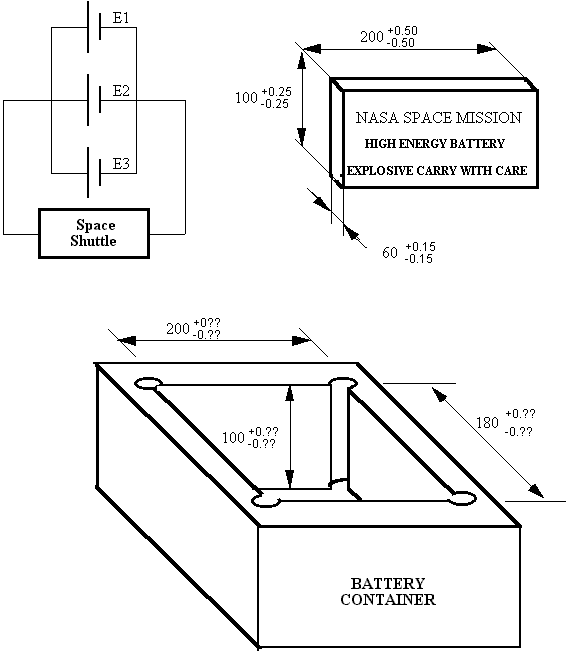
The space shuttle is equipped with a battery system. The reliability
of a selected battery manufactured by XYZ company is 99%, indicating
that the possibility of malfunctioning during the service is one
out of one hundred. To secure the space shuttle mission, three
batteries are connected in parallel to supply the power to the
space shuttle. You are asked to design a battery container to
hold the three batteries. The required design specifications
are listed below:
1. A minimum clearance of 0.1 mm is required to ensure that three batteries can be inserted into the container without pushing through.
2. A maximum clearance of 0.4 mm is required
to ensure that the inserted batteries remain in a stable status
without shaking during the operation.

Your responsibility is to determine the tolerance
range for each of the three dimensions. This is an open end problem.
Therefore, try your best. You may apply the concept of statistical
control as discussed in the classroom where an entire tolerance
ranges is equal to 6s
(s = standard
deviation of dimensional variation)..
Problem 3
Integration of CAD and CAM systems ems. Advanced CAD systems
have been focused on 3D solid modeling. Designed objects are
constructed in a three-dimensional space. However, there is a
significant amount of designs which require representations in
2 dimensional and/or 2dimensional spaces. The following figure
is a representative engineering drawing in the 2dimensional space.
All the geometrical features are constructed in a 2D space with
the third dimension - depth (or height) specified in a format
called "NOTES".
DESIGN NOTES:
1. The thickness of the plate is 20 mm.
2. The depth of the pocket is 2 mm.
3. The plate material is aluminum.
You are asked to prepare a NC program written
in G-code and M-code. In the process of completing this homework
assignment, the following assumptions are made:
1. The clearance plane is 2 mm above the top surface of the workpiece.
2. There is only one tool available. It is an end mill with a diameter equal to 12 mm. The machine tool available has to be the machine tool you have used in the lab session.
3. The tool height compensation information is installed in register H9.
4. You have the choice of setting x=0 and y=0.
5. Your program should be prepared in a standard format:
6. Justify your selections of spindle speed, feedrate and depth of cut.
7. Show your work on the calculation of position
compensations.
%
O1234
.....
.....
.....
.....
%
