Enable HTTPS on GeoServer
Here’s a short tutorial on installing SSL Certificate for Jetty Server that comes bundled with GeoServer.
Disclaimer: The following steps are performed and tested in Windows OS.Generate PFX Certificate
You can create self-signed certificate and export it as a pfx file in PowerShell as administrator. For this, run the following command:
$cert = New-SelfSignedCertificate -certstorelocation cert:\localmachine\my -dnsname <domain name>
For my example:
$cert = New-SelfSignedCertificate -certstorelocation cert:\localmachine\my -dnsname g.umd.me.uk
Then:
$pwd = ConvertTo-SecureString -String 'password' -Force -AsPlainText
$path = 'cert:\localMachine\my\' + $cert.thumbprint
Create certs folder under C: drive, and then run:
Export-PfxCertificate -cert $path -FilePath C:\certs\powershellcert.pfx -Password $pwd
Install the certificate by using the following command (Import-PfxCertificate (pki) | Microsoft Learn):
$mypwd = Get-Credential -UserName 'Enter password below' -Message 'Enter password below'
$params = @{
    FilePath = 'C:\certs\powershellcert.pfx'
    CertStoreLocation = 'cert:\localmachine\my'
    Password = $mypwd.Password
}
Import-PfxCertificate @params
Generate KEYSTORE file
Keystore file is required by Jetty for SSL configuration. Hence, convert the PFX file to JKS Keystore and then install it on the Jetty Server that comes with GeoServer.
- Go to ‘bin’ folder of JDK and run the following command in cmd:
keytool -importkeystore -srckeystore C:\certs\powershellcert.pfx -srcstoretype pkcs12 -destkeystore C:\certs\keystore -deststoretype JKS
Sample output:
PS C:\Users\Administrator> keytool -importkeystore -srckeystore C:\certs\powershellcert.pfx -srcstoretype pkcs12 -destkeystore C:\certs\keystore -deststoretype JKS
Importing keystore C:\certs\powershellcert.pfx to C:\certs\keystore...
Enter destination keystore password:
Re-enter new password:
Enter source keystore password:
Entry for alias te-75440268-ad52-462b-a4cc-541b73ce439b successfully imported.
Import command completed:  1 entries successfully imported, 0 entries failed or cancelled

Warning:
The JKS keystore uses a proprietary format. It is recommended to migrate to PKCS12 which is an industry standard format using
"keytool -importkeystore -srckeystore C:\certs\keystore -destkeystore C:\certs\keystore -deststoretype pkcs12".
**Tip: Use the same password that you used to generate the pfx file
- Now, execute the following command to verify if the created keystore is a PrivateKeyEntry.
keytool -list -keystore C:\certs\keystore -storepass password
Sample output:
PS C:\Users\Administrator\Downloads\jetty> keytool -list -keystore C:\certs\keystore -storepass password
Keystore type: jks
Keystore provider: SUN

Your keystore contains 1 entry

te-41a518cc-d63f-4127-aeb1-41b1b38e03d5, Aug 19, 2026, PrivateKeyEntry,
Certificate fingerprint (SHA-256): D0:71:4A:B3:D0:04:BC:E8:B4:38:9E:24:8D:61:CF:EB:79:AF:29:74:E2:BB:A8:23:84:A2:F6:6F:03:DC:28:45

Warning:
The JKS keystore uses a proprietary format. It is recommended to migrate to PKCS12 which is an industry standard format using
"keytool -importkeystore -srckeystore C:\certs\keystore -destkeystore C:\certs\keystore -deststoretype pkcs12".
- Copy the generated keystore to %GEOSERVER_HOME%\etc\keystore
cd C:\certs
cp keystore "C:\Program Files\GeoServer\etc\keystore"
Configure Jetty Server
- Open the start.ini in %GEOSERVER_HOME% and copy the following to after --module=http
#SSL
--module=ssl
jetty.ssl.port=8443
jetty.sslContext.keyStorePath=etc/keystore
jetty.sslContext.trustStorePath=etc/keystore
jetty.sslContext.keyStorePassword=password
jetty.sslContext.keyManagerPassword=password
jetty.sslContext.trustStorePassword=password
--module=https
jetty.httpConfig.securePort=8443
- Download the jetty-distribution file (it must be the same version as in the geoserver — geoserver 2.21 and 2.22 uses jetty 9.4.48) from maven eclipse site and extract the contents.
Create jetty folder in Downloads folder, move the zip file into it, and then unzip in PowerShell:
Expand-Archive -Path "C:\Users\azureuser\Downloads\jetty\jetty-distribution-9.4.48.v20220622.zip" -DestinationPath "C:\Users\azureuser\Downloads\jetty"
**Tip: You can cross check the jetty version in %GEOSERVER_HOME%/lib
(3 files are required — ssl.mod, jetty-ssl-context.xml and jetty-util-xx.jar)
- Copy ssl.mod from /modules to %GEOSERVER_HOME%\modules
- Copy jetty-ssl-context.xml from /etc to %GEOSERVER_HOME%\etc
- Copy jetty-util-x.x.xx.jar in lib to any path on the machine and navigate to this path in cmd
Run this command:
java -cp jetty-util-<JettyVersion>.jar org.eclipse.jetty.util.security.Password password
and obtain the obfuscated password (OBF:….)
For my example:
java -cp jetty-util-9.4.48.v20220622.jar org.eclipse.jetty.util.security.Password password
Sample output:
PS C:\Users\Administrator\Downloads\jetty> java -cp jetty-util-9.4.48.v20220622.jar org.eclipse.jetty.util.security.Password password
2026-09-13 18:42:48.013:INFO::main: Logging initialized @444ms to org.eclipse.jetty.util.log.StdErrLog
password
OBF:1v2j1uum1xtv1zej1zer1xtn1uvk1v1v
MD5:5f4dcc3b5aa765d61d8327deb882cf99
- Copy the OBF password and replace the existing OBF password in jetty-ssl-context.xml
<Set name="KeyStorePassword"><Property name="jetty.sslContext.keyStorePassword" deprecated="jetty.keystore.password" default="OBF:1vny1zlo1x8e1vnw1vn61x8g1zlu1vn4"/></Set>
<Set name="KeyManagerPassword"><Property name="jetty.sslContext.keyManagerPassword" deprecated="jetty.keymanager.password" default="OBF:1u2u1wml1z7s1z7a1wnl1u2g"/></Set>
Change to:
<Set name="KeyStorePassword"><Property name="jetty.sslContext.keyStorePassword" deprecated="jetty.keystore.password" default="OBF:1v2j1uum1xtv1zej1zer1xtn1uvk1v1v"/></Set>
<Set name="KeyManagerPassword"><Property name="jetty.sslContext.keyManagerPassword" deprecated="jetty.keymanager.password" default="OBF:1v2j1uum1xtv1zej1zer1xtn1uvk1v1v"/></Set>
**Tip: If port needs to be changed, make changes in jetty-ssl.xml (jetty.ssl.port) in etc folder:
<Set name="port"><Property name="jetty.ssl.port" deprecated="ssl.port" default="8443" /></Set>
Change to:
<Set name="port"><Property name="jetty.ssl.port" deprecated="ssl.port" default="443" /></Set>
Also change start.ini in %GEOSERVER_HOME%
#SSL
--module=ssl
jetty.ssl.port=443
jetty.sslContext.keyStorePath=etc/keystore
jetty.sslContext.trustStorePath=etc/keystore
jetty.sslContext.keyStorePassword=password
jetty.sslContext.keyManagerPassword=password
jetty.sslContext.trustStorePassword=password
--module=https
jetty.httpConfig.securePort=443
- Restart the GeoServer service by stopping and starting GeoeServer:
net stop geoserver
net start geoserver
In the firewall configuration of your machine, you may need to open the local port 443 or 8443. Click Start > Windows Administrative Tools > Windows Defender Firewall with Advanced Security. Click on Inbound Rules, and then New Rule. Select Port. Set them as follows:
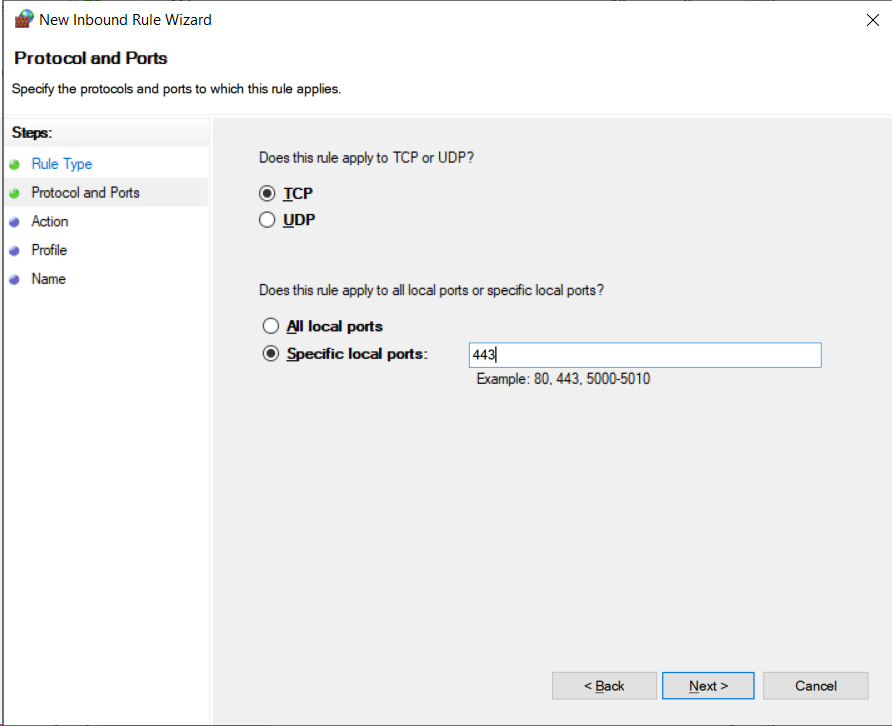
Allow inbound traffic at port 443.
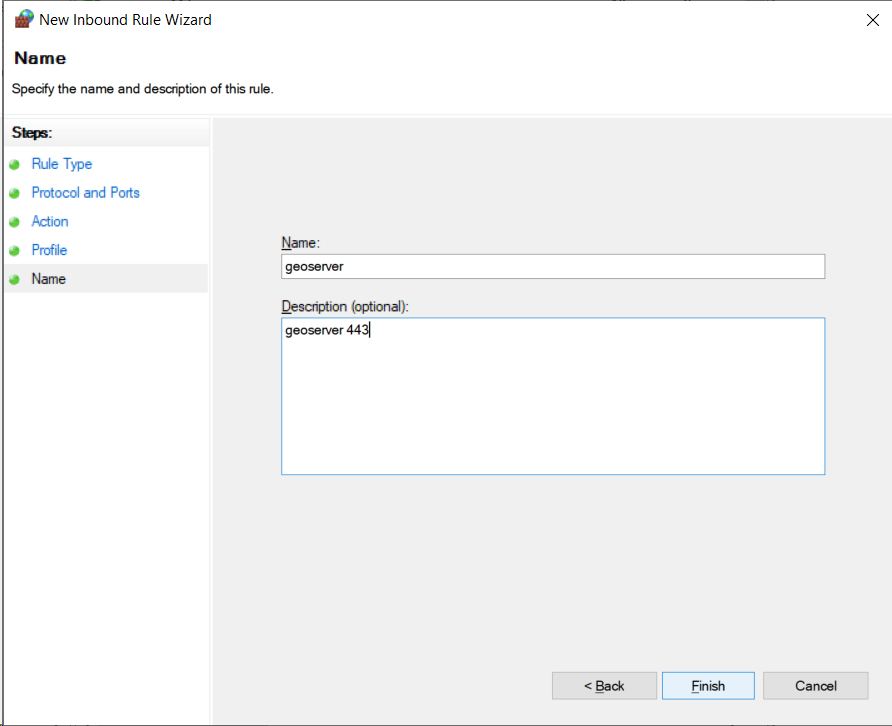
Specify the name and description of the rule.
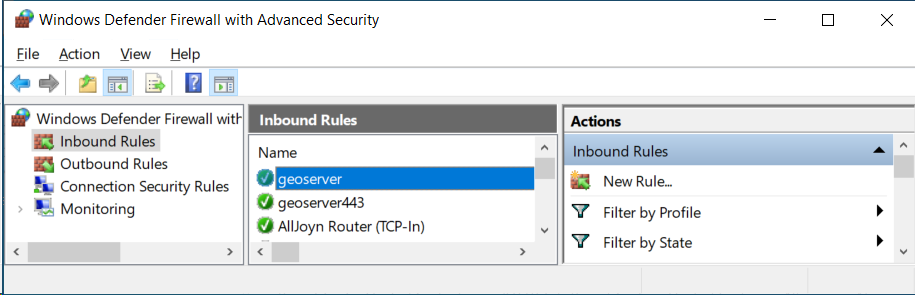
The new inbound rule is added for GeoServer.
Now, you will be able to access secure GeoServer using https://<domain>:<port>/geoserver/web/
Cheers!
Posted on September 18, 2026 by Xin Tao