|
For those of you who have actually tried looking for instructions on how to do this, you'll most likely have found that the instructions given really don't make a lot of sense. Well, my friends, I'm here to give those easy, step-by-step instructions... There are a couple ways to do this. If you want to use telnet to create your pages, just continue on to Step 1: How to log on to your Wam account. I find it much easier, however, to use trusty ol' Windows Notepad and an FTP program. So if you want to do it this way, you can skip the telnet instructions and head straight to the FTP instructions. |
| Using Telnet: |
| Step 1: How to log on to your Wam account |
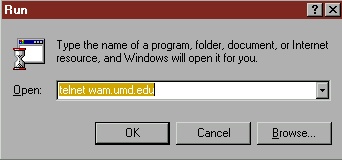
Log onto your wam account through telnet. To do
this:
|
| Step 1b. How to get to your WAM mail |
| Ok, so this part doesn't really have anything to do with making a web page, so if that's what you're here for, feel free to skip this. But while we're at this point in signing in to the wam account, if you want to get your mail here, just type in pine and hit ENTER. That'll get you to your mail account and from there just follow the commands at the bottom of your screen to get to where you need to go. |
| Step 2: How to get to the webpage editor |
Ok, here's how to get to the webpage editor:
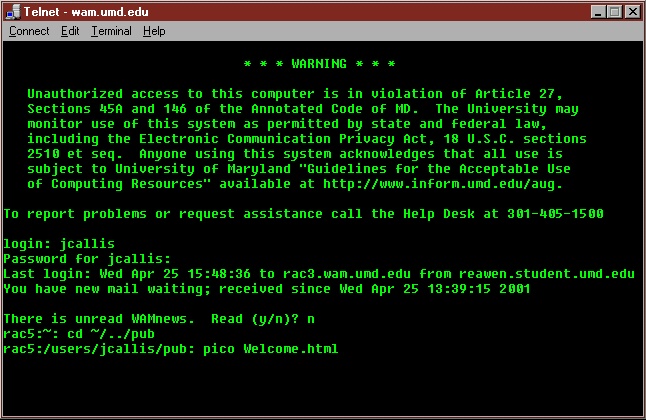 This will open up Pico, which is the editor you can write your HTML in. The file you are creating here is called "Welcome.html" and is the main page (your start page) of your website. To work on any other file, just type what you want to call it after pico when you're getting to the editor. For example, this web page file is called "Wam.html" so to edit this, after I log in to wam, I type: cd ~/../pub pico Wam.html If you want to learn HTML coding, need a brush up, or just blank out on a command or two, I've got a "how-to" on HTML at my other site, so feel free to check it out when you have need. |
| Step 3: How to use PICO |
You can see the commands for this at the bottom of your telnet screen, so most of it is fairly self explanatory. Note that the carot (^) before the letters means to hold the control key (CTRL) while hitting the letter. For example, to exit pico, the command
says "^X" so you hold down CTRL and hit the X key. Also note that the save command is called "WriteOut" in pico (^O) and the open command is called "Read File" (^R).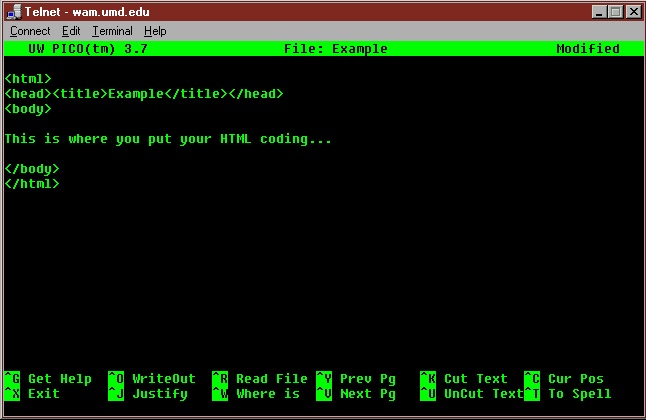 |
| Step 4: How to find your website |
|
So now that you've made this spectacular webpage, where is it? Remember that login/user name you used to get into your wam account? I hope so, 'cause you'll need it in your web address. Here's what the wam addresses look like: http://www.wam.umd.edu/~username For example, my login/user name for wam is jcallis. So here's my web address (URL): http://www.wam.umd.edu/~jcallis |
| Make sense? Well, if it doesn't, don't blame me. It's better than the other instructions I've seen!! Anyway, if you have anymore questions, feel free to ask me! If you want upload pictures, sounds, or if you want to use Notepad or something else rather than pico, you'll need to FTP. These instructions are below, so keep reading! |
| Using FTP: |
| Step 1: How to create a Web Page in Notepad |
|
When coding in Notepad, you just write the HTML exactly as you would in pico or whatever editor you usually use. The only thing you need to do is when saving it, make sure you save as an html file. There won't be an option for this in the drop down bar beside "file type," but you can just type it in. If you're making the page you want as your start page, it must be called Welcome.html. So type exactly that when you're saving it in notepad and you're set! Easy, huh? If you want to learn HTML coding, need a brush up, or just blank out on a command or two, I've got a "how-to" on HTML at my other site, so feel free to check it out when you have need. |
| Step 2: Getting an FTP Program |
| Ok, now obviously you'll need an FTP program to do any FTPing. (Well, you can do it using DOS, but that's a bit old-school for most of us...) I use WS_FTP, which works nicely for me. There are plenty of FTP programs out there to download, such as CuteFTP, so if you need one, just go browsing on the internet and you should be able to find one. If you need help getting started on your search, try searching at Winsite - just type in FTP and you should find several. |
| Step 3: Accessing your WAM account through FTP |
Now that you've got your FTP program, how do you access your WAM? The location you want to access is wam.umd.edu. You'll use your regular WAM login name (user name) and password to login with the FTP. Here's what the connection screen looks like with WS_FTP (use the "Connect" button to access this screen): |
| Step 4: Navigating your WAM account with FTP |
You're into your WAM account, now you need to know where to put your files. When you first login, you'll be in the "home" folder. Where you want to be is in your "pub" folder, so you'll need to go up a level, then to pub. Confused? Ok, if you're using WS_FTP, the right part of your screen (the Remote System part) when you log in should look something like this one: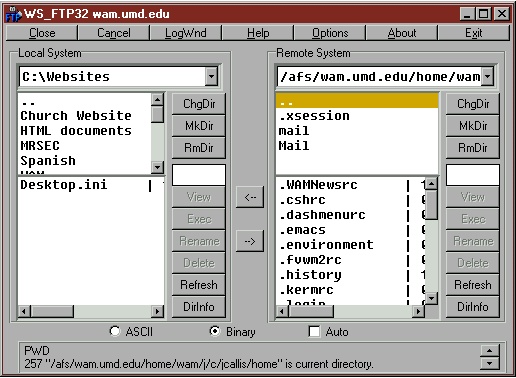 From there, double click on the ".." above .xsession to move up a level. If you're using another FTP program, there should be some similar way to go up a level. If it just lists out the path, you can just take off the /home at the end of the path to get back to the root directory (which is a level above it). Assuming you've figured out how to move up a level, you should now see new folders displayed, including home (which is where you just were), and pub (which is where you want to be): 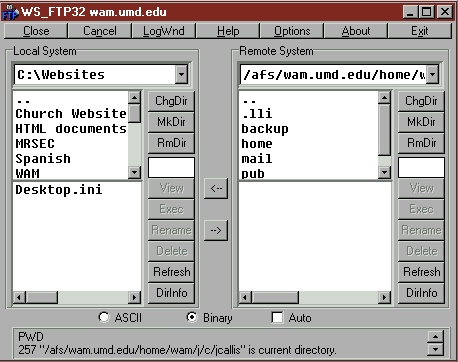 Double click on pub to open that folder. Now you're in the spot you want to upload your files for the website to. The Welcome.html (your start page) must go here. You can also make other folders in this directory if you want to organize your files better. You'll note below that I have a folder called "Pics" and one called "Sounds" in my pub directory. This is only for organizational purposes, so I can find the files I'm looking for when I want them! 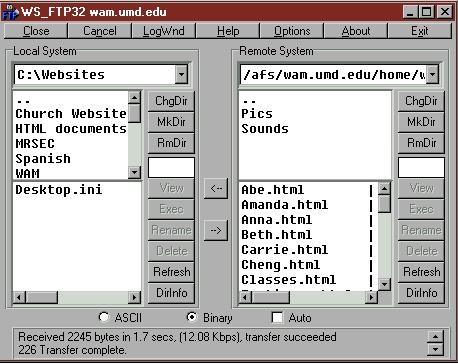 In WS_FTP you upload your files by clicking on them to highlight the file on the left, then using the right arrow button to transfer it to your directory on the right. You can also just double click on the file on the left to upload it. Note that the file will not show up on your screen on the right until you hit the "Refresh" button. |
| Step 5: How to find your website |
|
So now that you've made this spectacular webpage, where is it? Remember that login/user name you used to get into your wam account? I hope so, 'cause you'll need it in your web address. Here's what the wam addresses look like: http://www.wam.umd.edu/~username For example, my login/user name for wam is jcallis. So here's my web address (URL): http://www.wam.umd.edu/~jcallis |
| Questions? Feel free to ask me! Good luck! |
