MANN GCA DSW 4800 Wafer Stepper
Alignment Procedure
Every alignment consists of two separate sub-alignments. First, the reticle
is aligned to the column. Second, the wafer is aligned to the column.
Finally the exposure pass is executed.
- Reticle Alignment Procedure:
- Unlock the spindle lock to release the maximus column.
- Place the maximus column at an intermediate position to allow
access to the reticle platen.
- Remove the dummy reticle.
- Place reticle on the reticle platen chuck, chrome side down.
- Rotate the maximus column until the reticle alignment
microscope is in the alignment position.
DO NOT TIGHTEN THE SPINDLE LOCK KNOB AT THIS TIME.
- Center the X,Y, and theta reticle micromanipulator micrometers with their
travel gauges located adjacent to their respective knob controls.
-
- a) If the fiducials are not within the field
of view, carefully move the reticle with your index fingers
until the fiducials are within the field of view.
- b) When the fiducials are within the field of view, tighten the
SPINDLE LOCK to secure the maximus column, which also lowers the
micromanipulator onto the reticle.
- Align the platen/reticle fiducials with the microscope. Use the micromanipulator
X and Y controls to align the right-hand fiducials, and the theta control
to align the left-hand fiducials. Alternate between X-Y and theta until
the reticle is aligned to the column.
- Push in the PLATEN VACUUM knob to secure the reticle
to the platen vacuum chuck.
- Recheck fiducial alignment.
- Release the SPINDLE LOCK knob and rotate the maximus column to
position the lens assembly over the reticle. Gently retighten
the SPINDLE LOCK knob.
- Check the reticle shutters (X,Y) on the maximus column for desired aperture.
- Wafer Alignment Procedure:
Manual alignment is the only alignment option available with the
stepper configuration at LPS. Each wafer is manually aligned to the
maximus column reference fiducials using the TV alignment system.
The stages are moved by the X-Y and theta joysticks on the button box.
- Issue the ORIG keyboard command.
- Place wafer on the wafer carrier chuck.
- Switch on the 3" vacuum.
- Place wafer carrier chuck on the stage chuck.
- Switch on the stage vacuum.
- Issue the EXEC or EXPO keyboard command.
- Upon starting an exposure pass with EXEC or EXPO and getting the prompt "START AWH":
- Turn up the brightness and contrast controls on the TV monitor.
- On the button box:
- Press RES (Reset).
- Press MAN (manual) and S/C (start continue) simultaneously.
Wait for the digital THETA MOVEMENT INDICATOR to stabilize at zero.
- Press MAN (manual).
- The AWH is now ready for wafer alignment and subsequent exposure.
- Use the button box controls and the keyboard controls for wafer alignment and exposure. Zero the digital Focus Meter before pressing EXP.
- Post-Exposure Routine:
- Turn off the brightness and contrast controls on the TV monitor.
- Use the keyboard control CTRL-Q to exit the pass routine.
- Unlock the spindle lock to release the maximus column.
- Place the maximus column at an intermediate position to allow
access to the reticle platen.
- Pull out the PLATEN VACUUM knob to release the reticle, then carefully remove it.
- Place the dummy mask on the platen.
- Switch the stage vacuum OFF.
- Remove the wafer carrier chuck from the stage chuck.
- Switch the 3" vacuum to OFF.
- Remove the wafer.
- Close the environmental chamber doors.
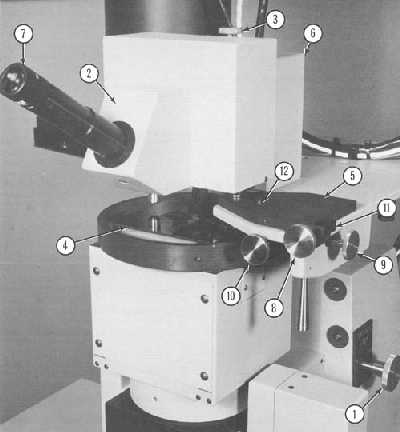
1. Spindle Lock Knob
2. Reticle Alignment Microscope Assembly
3. Microscope Focus Knob
4. Reticle Vacuum Chuck, shown with reticle in place
5. Micromanipulator Assembly
6. Microscope Assembly Cover
7. Microscope Eyepiece
8. Theta Motion Knob, micromanipulator
9. X Motion Knob, micromanipulator
10. Y Motion Knob, micromanipulator
11. Motion Indicator Pin