Phase I: Isolation of Bacillus Subtilus
I. Enrichment Media Construction
A. Concoct a solution
composed of the following materials in 2 liters of
distilled water:
· 60.0 g soluble starch
· 40.0 g agar
· 10.0 g Polypeptone
· 10.0 g Yeast Extract
B. Slowly heat solution
to a boil.
C. Autoclave solution
for 15 minutes at 15 psi pressure.
D. Swirl media to suspend
starch.
E. Pour media into petri
dishes.
F. Allow plates to solidify
overnight.
II. Isolation and Maintenance of Bacillus subtilus
A. Obtain two soil samples
from the following locations:
1. Tree by the Microbiology Building
2. Behind McKeldin Library
B. Sprinkle Soil Sample
one on a plate
C. Sprinkle Soil Sample
two on a plate
D. Perform a serial
dilution of soil samples one and two
1. For each sample, mix 0.06 g of soil in 1000 mL of saline solution using
a vortex machine.
2. Transfer 100 mL of soil solution to a test tube containing 900 mL of
saline solution resulting in a 10-1 dilution.
3. Do this eight more times.
4. Plate 100 ml of the from the 10-1, 10-3, 10-5, 10-7, 10-8, and 10-9
dilution
tubes.
E. Incubate all of the
tubes for 24 hours at room temperature, 25°C, at a pH
between 5.5 and 8.5.
F. The serial dilutions
were not successful.
G. Streak bacteria that
have a cream colored wrinkled morphology (Bergeys
Manual of Systematic Bacteriology Volume 2 1130). On the plate
with the
soil sample from the tree by the Microbiology building, a yellow-beige
colony grew. On the plate with the soil sample from behind McKeldin
Library, a coral-like beige colony grew.
H. Incubate plates at
room temperature for 24 hours.
I. To maintain
the bacteria, restreak the plates.
III. Identification of Bacillus subtilus
A. Begin series
of tests on both bacterial colonies in order to decipher which
bacterial colony is truly Bacillus subtilus. They are the following
(the
expected result is indicated in parentheses next to the test):
1. Gram Stain (Positive)
2. Endospore Test (Positive)
3. Motility Test (Positive)
4. Catalase Test (Positive)
5. Thioglycate Test (Negative)
B. Gram Stain
1. Soil Sample from the tree by the Microbiology building:
Pink and Purple Rods, which indicates that the culture is not pure
2. Soil Sample from behind McKeldin Library:
Gram Positive Purple Rods, as expected
*After consultation with Dr. Smith, we amended
the above protocol due to the fact that starch is not the only carbon source
in the above media. Thus, we cannot be sure that these bacteria definitely
degrade starch. In fact, after flooding the above bacterial plates
with iodine to check that the bacteria do degrade starch, we did not see
any changes in the plates. A clearing around the bacteria would have
indicated the presence of a starch-degrader.
Phase II: Isolation and Maintenance of Starch-degrading Bacteria
I. Isolation of Starch-degrading Bacteria
A. Obtain a second soil
sample from the tree by the Microbiology building.
B. Sprinkle soil sample
on three of the same plates used previously.
C. Incubate the plates
for 48 hours at room temperature, 25°C.
D. Properly discard
the plate that mold grew on.
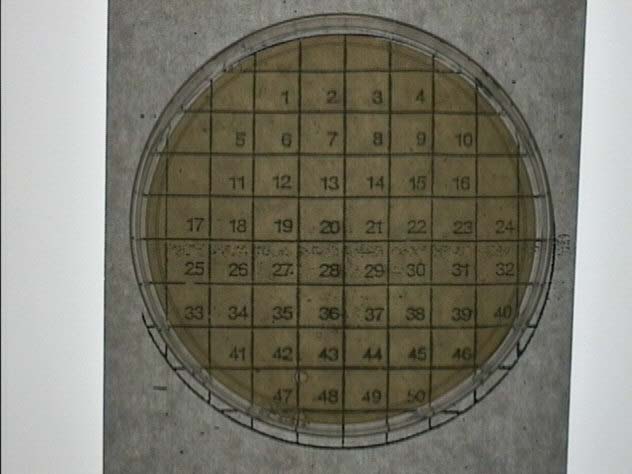
E. Tape a grid onto
the back of two new plates. *See Figure 1*
F. Swab a bacterial
colony.
G. Put it on the same
numbered square of the grid on both plates.
H. Incubate the plates
for 48 hours at room temperature.
I. Despite the growth
of mold on the plates, flood one of the plates with iodine.
J. By comparing this
flooded plate to the control plate, identify any clearings
around the colonies. This indicates that the bacteria degrade starch.
K. Streak three different
colonies onto new plates.
L. Incubate the plates
for 48 hours at room temperature.
M. Discard a plate if
there is an abundance of mold growth.
N. Restreak the bacterial
colonies.
II. Identification
of Starch-degrading Bacteria
A. Put enough bacterial
samples on slides so that a few characterizing tests can be
performed.
B. Perform the Oxidase
Test
1. A positive result is indicated by the bacteria turning blue.
2. A negative result shows no color change
C. Confirm Bacteria
Degrades Starch
1. Flood Plates with Bacteria
2. A clearing around the bacteria indicates that the bacteria degrades
starch.
D. Perform the Catalase
Test
1. The formation of bubbles indicates a positive result.
2. No bubbles indicates a negative result
E. Perform the Simple
Stain
F. Perform the Gram
Stain
Figure 1: This is an example of the
grid we used during Phase II of our procedure. Two of these plates
were used, and the same bacterial colonies were swabbed onto each grid,
creating two identical plates. One of these plates was flooded with
iodine to determine which colonies contained starch-degrading bacteria.
The other plate was used as a control. It was left untouched, and
then the colonies that degraded starch on the iodine plate were collected
from this control plate and streaked.