 Return to the Title Page
How We Did It
Directions were drawn and written by Erin, Age 10
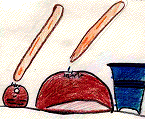
Step 1
 Roll a piece of clay into a ball.
Step 2
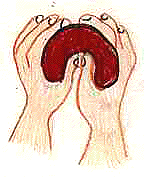 Turn the clay ball upside down and press your thumbs into the center of the
ball to form the shape of a pot.
Turn the clay ball upside down and press your thumbs into the center of the
ball to form the shape of a pot.
Step 3
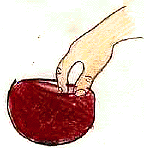 Pinch the edges.
Step 4
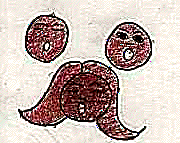 Make the head of your doll (person or animal) out of a smaller ball of clay.
The eyes can be opened or closed. The mouth should be open so it looks like
the character is telling a story and add hair if you like.
Make the head of your doll (person or animal) out of a smaller ball of clay.
The eyes can be opened or closed. The mouth should be open so it looks like
the character is telling a story and add hair if you like.
Step 5
 To attach the head
flip over the pinch pot and etch where the head will be placed.
Do the same on the head to the place where the head will touch the pinch pot.
To attach the head
flip over the pinch pot and etch where the head will be placed.
Do the same on the head to the place where the head will touch the pinch pot.
Step 6
 Make a mixture of clay and water (called slip) and put it on the etched area
of both things you will attach. Use a tongue depressor to spread the slip (mixture of
clay and water) on
both areas.Then put the pieces together and smooth out the areas where
the parts meet.
Make a mixture of clay and water (called slip) and put it on the etched area
of both things you will attach. Use a tongue depressor to spread the slip (mixture of
clay and water) on
both areas.Then put the pieces together and smooth out the areas where
the parts meet.
Step 7
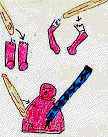 To make arms and legs for your doll, roll four tubes of clay (2 fatter ones
for the legs and two thinner ones for the arms). Then add shoes, toes or
finger markings on the clay if desired. Arms can be placed in several
positions. Attach the legs and arms using the same method you used
to attach the head in steps 5 and 6.
To make arms and legs for your doll, roll four tubes of clay (2 fatter ones
for the legs and two thinner ones for the arms). Then add shoes, toes or
finger markings on the clay if desired. Arms can be placed in several
positions. Attach the legs and arms using the same method you used
to attach the head in steps 5 and 6.
Step 8
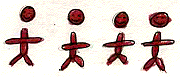 There should be at least 3 or 4 babies on your doll. Shape your babies
out of small balls of clay. Add smaller balls of clay for the heads.
There should be at least 3 or 4 babies on your doll. Shape your babies
out of small balls of clay. Add smaller balls of clay for the heads.
Step 9
 Attach babies by etching both the baby and the spot on the doll where you
will attach the baby. Use the same method you used
to attach the head in steps 5 and 6.
Attach babies by etching both the baby and the spot on the doll where you
will attach the baby. Use the same method you used
to attach the head in steps 5 and 6.
Step 10
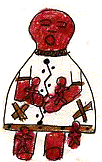 Storyteller dolls are traditionaly painted the natural colors of the desert,
beigh, maroon, white and black.
Storyteller dolls are traditionaly painted the natural colors of the desert,
beigh, maroon, white and black.
Return to the Title Page